Rooster Hat
During a Red Day in the Syracuse Area, a kindergarten class made a rooster hat for the Barnyard Boogie out of poster board. All the students looked adorable in their hats while singing the Barnyard Boogie to Red. Poster board can be a little slippery so we redesigned the rooster hat and made it out of stiff felt. That is the picture that you see below. A mom from a pre-school in Syracuse used the design below but did not use stiff felt. Instead she used regular felt and cut the back of the white (where it sets on the back of a child's head) more in the shape of the back of a head. It fit on the child's head securely and did not need to be tied on to the child's head. That works much better!
Materials:
1. 2 pieces of white stiff felt (24” x 14”)
2. 1 piece of red stiff felt
3. Some yellow stiff felt
4. Two 1” diameter googly eyes (I bought mine at a craft store)
5. Glue gun
6. Hot glue
7. Some red yarn
(See picture for pattern)
Procedure:
1. Make the comb (the crown) and the waddle using the red stiff felt and the picture below as your guide. The crown only needs to be one piece, but the waddle cut two pieces exactly the same.
2. Cut two pieces for the yellow beak using the picture below as your guide. Using the two white stiff felt pieces, cut two heads exactly the same using the picture below as your guide.
3. Hot glue one beak to the inside of a white stiff felt head and glue the other beak the other inside white stiff felt head. Then do the same with the waddles. Set the comb (crown) between the two white stiff felt pieces way at the top and hot glue the crown to the head and finish gluing the white stiff felt together at the top only. What remains opened (in other words, what doesn't get glued together on the head) is the bottom of the head and where the waddle and beaks are – that is where the child's head will fit into the hat.
4. Glue the eyes onto the head.
5. Punch a hole into the waddles and tie string or yarn through them so that a child can tie the hat securely onto his/her head.
Activity 1:
1. Play the Barnyard Boogie from Red's recording Teaching Peace
2. Talk about what a rooster looks like, how they act, etc. We've attached a link to a website that includes the anatomy of a rooster and hen as a guide for you:www.aces.uiuc.edu
3. Like the Barnyard Boogie, humans have different talents and can be unique in their own ways. Discuss what life would be like if everyone were exactly the same. Discuss how we can appreciate every one's talents and individuality.
4. If you have a shadow screen in your classroom, playing the Barnyard Boogie and wearing the rooster hats is so much fun when doing it behind the shadow screen. You could also use the rooster hats for a performance on a special day like Mother's Day, Grandparents' Day, etc.
Activity 2: A simple square dance for movement
This activity can be used with the rooster hats mentioned above. Students should be in 2 long lines facing each other. The lines should be about a foot apart.
|
I know a rooster down on the farm |
Both lines take 8 steps away from each other |
|
Everyday at dawn he sounds the alarm |
Both lines take 8 steps toward each other to be back at the beginning again. |
|
He doesn't do it like the other roosters do |
Both lines take 8 steps away from each other |
|
He sings, "Cock-a-doodle-oodie-oodie-oodie-oodie-oo" |
Both lines take 8 steps toward each other while flapping their arms like a rooster. |
|
Chorus: He's a swinging, singing rooster. He loves to improvise. He's the kind of clucker who was born to harmonize. |
Swing with the person in the other line that is standing in front of you. |
|
And everyday at dawn as the sun begins to rise you can hear him do the barnyard boogie |
Swing with your partner in the opposite direction. |
|
During the rooster sounds |
Both lines dance freely the way they think the rooster might be dancing |
|
Now all over the country everybody's heard |
Both lines take 8 steps away from each other |
|
About the Barnyard Boogie and the one they call the bird |
Both lines take 8 steps toward each other to be back at the beginning again. |
|
Bantams and Leghorns they can't resist the beat |
Line 1 bows to Line 2 then line 2 bows to line 1 repeat |
|
Bobbin' up and down while they're dancin' with their feet. |
Both lines bob up and down. |
|
Chorus: He's a swinging, singing rooster. He loves to improvise. He's the kind of clucker who was born to harmonize. |
Do-Sa-Do with the partner in front of you. |
|
And everyday at dawn as the sun begins to rise you can hear him do the barnyard boogie |
Do-Sa-Da in the opposite direction. |
|
During the rooster sounds |
Both lines dance freely the way they think the rooster might be dancing |
|
Verse 3: Repeat Verse 1 moves |
| ["Barnyard Boogie" Rooster Hat] | 27 kB |
Materials Needed
1. One striped sock per student. Anklet to knee sock size works best. Booties or Footie Socks (socks that don't go past your heels) won’t work. We used black/gold stripes but using any colors for stripes makes for a more unique bee. We were able to find lots of striped socks in dollar stores. Often times the socks were 2 pair for a dollar.
2. One 12 inch pipe cleaner per student. We used black but feel free to be creative when it comes to color.
3. Two eyes per student. We used eyes that were ¾ inch in diameter.
4. Three Styrofoam semi-circles (with a 2 ½ inch diameter) per student.
5. Pattern for wings (see attached image).
6. Material to make wings.You can use construction paper, fun foam, stiff felt, or transparencies used from an overhead projector.
7. The song, Bebop Your Best from Red Grammer's recording, Bebop Your Best.
8. Glue, markers, scissors.
Activity
1. Play the song, Bebop Your Best and have students listen to the lyrics. Play the song again and this time have students sing the part “Be-bop your best” along with Red. You can give the students any kind of hand movement to use while singing the words “Bebop your Best”.
1. Have a discussion about what it means to “Bebop Your Best”.
2. Have students volunteer at what they are good at doing. Have students think about what they would like to work on being good at in the classroom for this year. It could be learning to tie their shoe or working on a character trait like being respectful.
3. Have students make a “Bee” bop (see instructions and image below).
4. Play the song again and the students can move their bee while singing the words “Bebop your Best”
5. Students can leave the bees on their desks as reminders or you can hang them on a bulletin board.
6. The bee could be a talisman for the students.
Make the Bee
NOTE: An image of the bee and an image of the wing pattern are at the bottom of this lesson.
1. Have students place the 3 Styrofoam semi-circles inside the sock so they lay side by side and represent the head, thorax and abdomen of the bee.
2. Tie a knot at the end of the sock. This will keep the Styrofoam semi-circles in place and the knot represents the stinger.
3. Take a pipe cleaner and cut it in half. Have the student push the 2 pieces of pipe cleaner into the front on the head of the bee. Then have the students twist the open end of each pipe cleaner into a circle to form the ends of the antennae.
4. With the help of an adult have the students glue the eyes onto the head of the bee.
5. Have students trace the pattern for the wings and cut out the wings. With younger students have an adult help or have the wings cut out ahead of time.
6. Have the student (or the teacher) write on the left side of the wings what the student can “Bee” bop their best at. On the right side of the wings have the student write what they want to work on (“Bee” bopping their best) during the upcoming school year.
7. Using a blunt pointed object like a butter knife or scissors, push the middle of the wings (the part that connects the wings) through the sock and into the Styrofoam semi-circle that is in the middle of the sock (the semi-circle that represents the thorax of the bee).
Extension
1. Read a story about bees. Two good books are The Honey Bee by Paula Hogan and The Magic School Bus Inside the Bee Hive by Joanna Cole. Point out that honey bees are hard workers and bees work together to get the job done. As students in the classroom, they should be like bees working hard together to get the job done.
2. Using the bee that students made from this lesson, have them review the parts of the honey bee: abdomen, antennae, head, thorax, eye, stinger, wings. Note: We have not used legs or the pollen baskets on the bees made in this lesson. You could have the students say what body part is missing. You could also have the students add legs to their bees.
Images
Objective
To support and develop each child's uniqueness at being their best.
Materials
Lamps of different shapes and styles
Pictures of unique lamps (We used google.com)
Strips of colored construction paper
Picture of each student in the class (head shot is al you need)
Pattern of hands and feet
CD player
Lesson
1. Play the song Bebop Your Best. While the song is playing, do some simple hand motions that students can follow along. Be sure to include some motions that cross the midline. When you get to the part where Red sings the words “Bebop Your Best” put your hands in the closed fists near your face. Have your hands pop open to the beat of the music. Your fingers will all point out (it gives the impression of a light blinking on and off). This is great for pre-school and Kindergarten classes. For older students you could have a student leader come up with movements. Go around a circle and each child adds one new movement.
2. Turn on the lamps of different shapes/styles. Talk about and point out the differences in the lamps. Ask what is the one thing that is the same for each lamp? (all the lamps give us light to be able to see no matter what shape or size). Explain that we are like lamps. We all might look different but each of us “shines” in our own unique way.
3. Have students pick out a lamp picture. Have each child glue their picture on the lamp shade of the picture.
4. Give the students 4 strips to add for legs and arms. The students can make the strips as long or as short as they would like and some students might even bend them into an accordion shape.
5. have students draw hands and shoes to add to the strips. For little ones you may have to supply the hands and feet for them to glue on.
6. Hang the pictures from the ceiling or put them on a bulletin board that says “Shine on and Bebop Your Best”
Big Brass Band Lesson
Materials needed:
- Clip art of drums, horns, cymbals and flutes.
- Enlarge the pictures on poster board and cut out.
- Some instruments like the drum or french horn will need string so the instrument can be placed on the student.
- The song the Big Brass Band from the recording, Can You Sound Just Like Me?
Activity:
- Show pictures of the different instruments used in a band. Better yet, have some high school students come in and bring their instruments to show and play so that students can listen to the different sounds. Discuss with students which instruments make low, high sounds. Have the students experiment trying to make the different sounds with their voices.
- Play the song Big Brass Band and have the students listen for the sounds of the different instruments and "play along" with their voices. For example: In the song, Red Grammer sings, "Here come the horns and they're playing out loud, Let's play like a big horn now" and then Red makes the horn sound with his mouth. Here the students can mimic the horn sound along with Red.
- On the same day or on another day, pass the poster instruments out to the students. You can have one for each student or have a few so that the students can learn to take turns.
- Play the song again and the students "play" their instrument where their part comes up in the song and imatating the sound with their voice.
- At the end of the song when all the instruments are being played at the same time, all the students play their instruments and make the sound with their voices and march around the room.
- Another time, have the instruments spread out on the floor in the middle of the room. Have students line up and call upon students to run to the center pick up an instrument and mimic the sound. You might have everyone whose first name begins with the letter "B' run to the center and pick up the cymbals to play, etc. At the end of the game each student picks up an instrument and plays along with the song, Big Brass Band.
Bucket Fillers, That's Who We Are - March and Motions
For Younger Students
Materials Needed: The students will need their Bucket Filling buckets. It they don't have an actual bucket they can use a picture of a bucket.
Preparation:
Line students' buckets around the classroom in a formation so that students can march around the buckets.
Activity:
Play the song, "Bucket Fillers, That's Who We Are" as students march around the classroom. When the song gets to the chorus the students stop in front of the nearest bucket and do the following motions
- "Bucket Filling, That's What We Do Here" - Pick up the bucket in front of you with one hand, with the other hand point your finger down into the bucket to show that you are trying to fill the bucket.
- "Bucket Filling, That's Who We Are" - set the bucket back down and with the index fingers point to yourself near your shoulders.
- "When a Bucket Needs Some Filling" - Same thing as step one only don't pick up the bucket. Use the sign language for bucket which is to have a fist in front of you and move it up like you are lifting a bucket by the handle (see http://www.babysignlanguage.com/dictionary/b/bucket/)
- "A Kind Word and a Helping Hand" - cup one hand near your mouth like you are shouting something and then extend your hand out with palm out to show that you are giving your hand.
- "A Perfect Way to Start" - Swing your arm up with a closed fist from your side to in front of your body, like you might be shouting "hurray".
- Go back to the first step for the next verse and repeat.
- Repeat chorus motions from steps 1-5.
Signs and Buttons
You can also march around the classroom or in the school building wearing buttons and carrying signs.

Caring and Compassion Activity Using Mirrors
Definition
Showing concern for the well-being of others; having regard for another's needs
Literacy
Wilfrid Gordon McDonald Partridge by Mem Fox
Now One Foot, Now the Other by Tomie de Paola
The Teddy Bear by David McPhail
When I am Old with You by Angela Johnson
Wednesday Surprise by Eve Bunting
Materials Needed
1. Mirrors for students. You can get small hand mirrors at a dollar store (usually sold 2 for $1.00) so that each group of students has one mirror for each group.
2. Clue sheets that are printed backwards. To print the clues backwards on a computer you should print out the sentence then save it as a jpeg.
3. The song “Caring and Compassion” from the recording, Bebop Your Best
4. A chart that lists at least 12 character traits. You can choose the list from Red's recording, Bebop Your Best.
Activity 1: The Mirror Game
(looking past ourselves)
1. Have students in 10 small groups.
2. Have each student in the group look at themselves in the mirror and either think about or say out loud what they see.
3. Have each student move the mirror to a position so that they see another student(s) in the group and describe what they see. Explain to the students that they will be talking about a new character trait today. In order to do this character trait they must look beyond themselves and look at others closely.
4. In order to find out what new trait they will be discussing they need to find the clues in the classroom. Have posted in your classroom on large paper backward clues. Each group must find one of the clues and use their mirror to figure out the clue.
5. When every group has a clue they will share the clue and you can list them on the board. You may need to discuss the clues as a large group. It helps to have a list of character traits for the students look at.
6. With primary students you can give them a hint by playing Red's song, “Caring and Compassion” and have them listen for a clue in the song for the character trait. With older kids they should be able to guess the clue. When the students guess the right answer, go over the clues again to show why caring and compassion is the right answer.
7. Play the song “caring and compassion” from Bebop Your Best
Bucket of Light Activity
This works great as a Morning Meeting activity.
Materials:
1. The students' bucket filler buckets
2. One flashlight or LED light that fits inside a student's bucket.
3. Stars and hearts made out of light-weight and light-in-color paper.
Activity:
1. At the beginning of the week each student is given a heart or star and asked to think about what they might like to write to the student of the week. It could be as simple as"You are wonderful".
2. On Friday, the students meet standing in a circle with their buckets and the heart or star that they have filled in.
3. The student of the week goes to the center of the circle with her bucket that includes the flashlight in the on position. Start the song, "Cirlce of Light". Children sing along as the student of the week walks around the inside of the circle. As she walks by each student in the cirlce they drop the star or heart which they wrote their message on into the student of the week's bucket.
4. During the chorus, the student of the week stands in the center of the circle and slowly turns around while holding her bucket up to her face so the light shines on her face and everyone else in the circle can see.
5. For the next verse the student of the week walks around the circle again. As she reaches each child she holds the bucket of light up to his/her face to show that the circle of light is in all of us. She continues this until she comes to the student who is designated to be next week's student of the week. She will bring the new student of the week into the center of the circle. She will then place the flashlight into the bucket of the new student of the week.
6. During the chorus the new student of the week will slowly turn in the cirlce with the bucket up close to his face so the light shines on his face.
NOTE: the new student of the week can be chosen by the present student of the week or that student can find out from the teacher whom she should pick for the next week. If the student is choosing, he/she must be aware that they need to choose a student that has not been picked yet.

Definition
The quality of following the rules and laws of school, community, country, and world.
Literacy
Just a Dream by Chris Van Allsburg
Materials Needed
An energy light ball (can be purchased for $10.00 at scientificsonline.com)
Activity: The Circle of Citizenship
Citizenship is a sense of “shared responsibility” for the common good. We often don't realize all the different parts that are played by community members to make our community “work”.
Have the participants make a circle and hold hands. Use the “light ball” and show how it lights up when the circle is connected and goes out when the circle is disconnected. Note that each member of the circle is unique: we all look different, wear different clothes, and have different talents and gifts to offer the group. The circle needs each one of us to bring our special offerings to the group for it to be complete.
Make a list with students of the many things that people do in your town that make it work so well: Volunteer ambulance corps, librarians, volunteer tutors at the high school, homeless shelter, mailman/woman, utility workers (electric power), Red Cross, garbage (sanitation) collectors, road repair crews, nurses, etc.
Ideas From Our Workshops
Red Grammer and Maria Knickerbocker have been giving workshops at education conferences for over 20 years. The ideas below have been collected from teachers and parents just like you or created up by our “braintrust” at Red Note Records (which features two former teachers).
Click on the song titles for activities.
Click on the CD cover photo to purchase a CD.


Inspiration from the Music
A Chance for All to Become Inspired
The Grammer's music not only teaches us about community awareness, problem solving, and cultural uniqueness, it is fun, uplifting and it allows us to be who we are. It inspires movement, art, stories, quiet times. It gives teachers and parents inspiration to begin again. That's what the workshop is all about – a chance to become inspired by the words, the music and the incredible tenor voice of Red Grammer.“The joy of physical movement is the sparkling common thread among dozens of ways to enliven children's learning” (Mimi Brodsky Chenfeld).
Rhythm Training and Physical Awareness
Rhythmic and repetitious movement activities allow children to develop body coordination, and an increased ability to sense the beat and rhythm of their experiences. Most music programs recognize the need for physical awareness of music and include movement. Rhythm training through movement, which is then applied to the instrument, can be very effective for both beginners and for students who are more advanced. Kinetic experiences link music concepts with physical sensation to clarify relationships between musical ideas. Movement and body awareness is part of the learning process, to not only build left brain dominance, but to integrate the right brain into every experience. There have been many studies that show that exercise makes learning easier as unnecessary stress is eliminated.
Switching ON the Brain
This workshop will show simple rhythmic and repetitious movements to go with a variety of Red's songs that can be used to “switch on the brain”. Typically, children learn to read by first being taught letters, then part of words, then complete words, and finally sentences. This must be true for physical education as well. Before children can be taught games or dances they must first know the 8 basic locomotor skills – walking, running, hopping, skipping, galloping, sliding, jumping, and leaping. children will have lots of opportunities as they grow to learn games and dances but first they must learn the basic skills needed for successful participation. (This information and more can be found in Children Moving: A Reflective Approach to Teaching Physical Education, Third Addition by George Graham, Shirley Holt/Hale and Melissa Parker).
It Comes Naturally
For many children these movements come naturally. A fun way to assess what skills a child has mastered is to play or sing “The Barnyard Boogie” while the children move in a circle. Like in a square dance, call out which skills you would like the child to perform in a circle. To add to the fun, do the Macarena movements during the chorus. For a greater challenge you can combine some of the skills (ex. 2 hops and 1 jump and then repeat).
As children become ready, they begin to combine skill themes and form movements that we call gymnastics, or dance. During this workshop we are going to share with you some ideas about moving with music that will include dance, improvisations, and simple hand gestures.
A Line Dance
Line dancing is popular at all age levels. Both boys and girls enjoy this type of dancing and are equally enthusiastic about participating. They especially enjoy this dance when the teacher participates as well. Try having the children wear cowboy hats and red bandannas!
Music: Digging for Diamonds from Red Grammer's recording Hello World!
Origin of steps:Dr. Grant Longley, Dance Instructor, Venice, FL.
Position: Solo, all facing head of Hall
Intro: Wait 8 count
Measures:
|
1m |
TOUCH R TOE TO SIDE |
Point right toe to right side. Touch right toe beside left foot. Point R T to R side, step right foot beside LF. |
|
2m |
TOUCH L TOE TO SIDE |
Point L Toe to L side, touch L beside RF, point LT to L side. Step LF beside RF. |
|
3m |
R HEEL FWD. TOE REAR |
Touch R Heel fwd., HOLD, touch RT to Rear, HOLD. |
|
4m |
R HEEL FWD. STEP |
Touch RH fwd., HOLD, step RF in place, HOLD. |
|
5m |
L HEEL FWD. TOE REAR |
Touch LH fwd., HOLD, step LF in place, HOLD. |
|
6m |
L HEEL FWD. STEP |
Touch LH fwd., HOLD, step LF in place, HOLD. |
|
7m |
R TOE SIDE REAR, Cross Ramble |
Extend RT to R side/rear, step RF XIF LF, extend L foot to left side at the same time make a 1/2 turn right; (now facing right hand wall). |
|
8m |
BACK UP FOUR |
Walk backward RF, LF, RF, LF clapping on 4th beat. |
With a little practice children from 4 years old and up can do this dance. If you feel that a low impact level would be more appropriate for your class, a variation to the dance is followed:
|
1m |
TOUCH R TOE TO SIDE |
Point right toe to right side. Touch right toe beside left foot. Point R T to R side, step right foot beside LF. |
|
2m |
TOUCH L TOE TO SIDE |
Point L Toe to L side. Touch L beside RF,point LT to L side. Step LF beside RF. |
|
3m |
R HEEL FWD. TOE REAR |
Touch R Heel fwd., HOLD, touch RT to Rear, HOLD. |
|
4m |
R HEEL FWD. STEP |
Touch RH fwd., HOLD, step RF in place, HOLD. |
|
5m |
L HEEL FWD. TOE REAR |
Touch LH fwd., HOLD, step LF in place, HOLD. |
|
6m |
L HEEL FWD. STEP |
Touch LH fwd., HOLD, step LF in place, HOLD. |
|
7m |
R STEP FWD., LEFT STEP QUARTER TURN |
With the right foot step forward then swing your left foot around for 1/2 turn. |
|
8m |
BACK UP FOUR |
Walk backward RF, LF, RF, LF clapping on 4th beat. |
Class Photo Album
The following are directions to make a delightful decorated classroom photo album based on the song down the do re mi, that students will love to have the opportunity to take home overnight and share with their parents.
Materials
One scrapbook
Acid free paper the right size for the scrapbook
Attached tracers (Tracer1 Tracer2)
The words to Down the Do Re Mi in large print for a big book. We made ours with the computer.
Red Grammer's recording, Down the Do Re Mi
Scissors
Markers
Stickers
Glue stick
Pictures of your students
Thin black string for staff
A picture of the world (many colorful pictures of the world can be found on holiday greeting cards)
Pages to Make
Page 1 and 2 are side by side. Use blue background paper and add birds and sun.
Page 3 the children are sliding down a ray of sun.
Page 4 is a picture of the world with a staff drawn around the world. Put notes on the staff and the children's pictures in the notes.
Page 5 is a repeat of Page 3 but you can use different pictures of the children.
Page 6 is two large notes with a + sign and then a drum. Children's pictures go on notes and drum.
Page 7 is a staff made of string and notes made to fit on the staff. Attach the notes with clothes pins. Kids pictures go on the notes.
Page 8 are hearts floating on the clouds. Kids pictures go on the hearts.
Page 9 is a repeat of age 3.
Page 10 is a family watching a heart balloon float through the air. Pictures go on the family and the heart.
Page 11 is a boy and girl singing in harmony.
Page 12 and 13 is a repeat of Pages 1 and 2.
Page 14 is a repeat of Page 3.
You can be creative and add flowers, stickers, etc. to make your pictures more colorful. This is a big book that the children can take home and read to their families and share pictures of their classmates.
 Tracer 1 – Print this page & cut out tracers
 Tracer 2 – Print this page & cut out tracers
The average human being sleeps a total of 24 years of a lifetime! That's a lot of nap time! “Dreamtime Rendezvous” is a wonderful song that can be used especially at nap time in your classroom.
Materials
1. The song “Dreamtime Rendezvous” from Red Grammer's recording, Down the Do Re Mi
2. The following books for classroom reading and class discussion:
Animals Asleep by Sneed B. Collard (2004 Houghton Mifflin Co., Boston)
Sleepy Book by Charlotte Zolotow (1986 Harper Collins)
Animals Don't Wear Pajamas by Eve B. Feldman (1992 Henry Holt & Co., New York)
Animals At Night by Sharon Peters (1983 Troll Assoc.)
A Time For Sleeping by Ron Hirschi (1993 Cobble Hill Books, New York)
3. Plain paper for children to draw on
4. CD player
5. On the last day of this lesson students can bring in their favorite animal to sleep with.
Objectives
1. A student can state that people and animals need to rest in order to stay healthy
2. A student will become aware that animals sleep in different positions and in different locations (i.e. dens, caves, rocks, water, and trees)
3. Students can demonstrate by acting out or drawing the way animal(s) may sleep that has been mentioned in the lesson
Lesson
1. Play the song “Dreamtime Rendezvous.”
2. Discuss how the family was sleeping all in a row, how we sleep in rows in our classroom and other times we might sleep in groups or in a row (firefighters at the fire house; sleeping with your family in a tent).
3. Discuss how we sleep in our pajamas and in our beds or on a couch.
4. Read Animals Sleep to show how animals also need sleep and that sometimes some animals can sleep in unusual ways.
5. Play “Dreamtime Rendezvous” while students are napping.
6. Repeat steps 1-5 on different days and on step 4 choose a different book each day that is mentioned in materials of this lesson.
7. Have students act out or demonstrate the way some of the animals they learned about sleep.
8. Have students either draw themselves sleeping with one of the animals or color a picture of one of the animals that was mentioned during the lesson. The attached pictures may be used.
9. Conclude the lesson by having the students come together with their stuffed animals that they brought to school and have them sing “Dreamtime Rendezvous” while “napping” with their stuffed animal.
List of animals that sleep in unusual ways:
1. A horse sleeps standing up
2. An orangutan likes to weave a nest of branches in the trees for a nice nap
3. Mother pandas often curl up to nap with their babies
4. Otters like to wrap themselves up in seaweed - the kelp keeps sea otters anchored in place while they are sleeping
5. Bird experts believe that sooty terns sleep or doze in midair as they slowly flap their wings
6. Butterflies often gather together at night to roost
7. Dogs seem to sleep in almost any position you can think of
8. Bats sleep upside down
9. A parrotfish surrounds itself with a mucus “sleeping bag” before going to sleep
10. A bottlenose dolphin can put half of its brain to sleep at a time - while half of the brain rests, the other half lets the dolphin slowly swim
11. Seals sleep with their flippers flat against blocks of ice
12. The snowy crane sleeps standing up on one long leg
13. Turtles sleep inside their shell
14. Caterpillars sleep in their silky cacoons
15. Spiders when they sleep are like small ink spots in the middle of their web
16. Opossums sleep upside down from the branch of a tree
17. Owls sleep during the day
Motions for Everybody Here Has a Bucket
Everybody here has a bucket (Yes)...with closed fist, lift one hand up slightly form your waist like you are lifting the handle of a bucket, or pail of milk. http://www.babysignlanguage.com/dictionary/b/bucket/ On the word "yes" raise a fisted hand over your head and shake hand once (like you are knocking on a door) http://www.babysignlanguage.com/dictionary/y/yes/
Everybody's bucket holds light (Right)...use the bucket motion like above again. For "right" with close fist raise your hand from waist to front of you (people also use this hand motion when shouting hurray only it is a lower cut instead of an upper cut)
Add a little light here and a little light there...hands extend across your body and wiggle your fingers for "here". Do it in the opposite direction for "there".
Till everybody's bucket shines bright...Turn in a circle to the beat of the music and on the word "bright" start with hands at your side begin to raise them up and over your head, hands open. Make sure your hands cross in front of you when they get to about your waist on your way up over your head. They should be uncrossed by the time you get to the top and fingers wiggling.
We get it going with... this line goes by quickly and you need to be bringing your hands back down to your side form the previous step so it looks like you have made a circle with both your hands when these 2 steps are complete.
With a helping hand...look like you are shaking your one hand in front of your chest to someone who is not there.
Here I Am...Look like you are raising your hand to answer a question in the classroom.
It's so easy...step side to side to the beat of the music.
The other motions are:
With a friendly look...Point to your eyes with your index finger and middle finger in a v formation and then point them out http://www.babysignlanguage.com/dictionary/l/look_at/
That's all it took.... hands are palms up, wrists are bent backwards and arms are out to your side with elbows bent and close to your waist
With a big hello...like hello in sign language with right hand in an open position moving outward from the forehead, almost as if saluting http://www.babysignlanguage.com/dictionary/h/hello/
What do you know...with one hand the index finger touches the temple and then moves out (like you motion, "ah-ha")
Make a friend...sign language for friend by hooking the right index finger over the left which is palm-up and repeat in reverse http://www.babysignlanguage.com/dictionary/f/friend/
Come on in... use one hand like you are waving for someone to come to you.
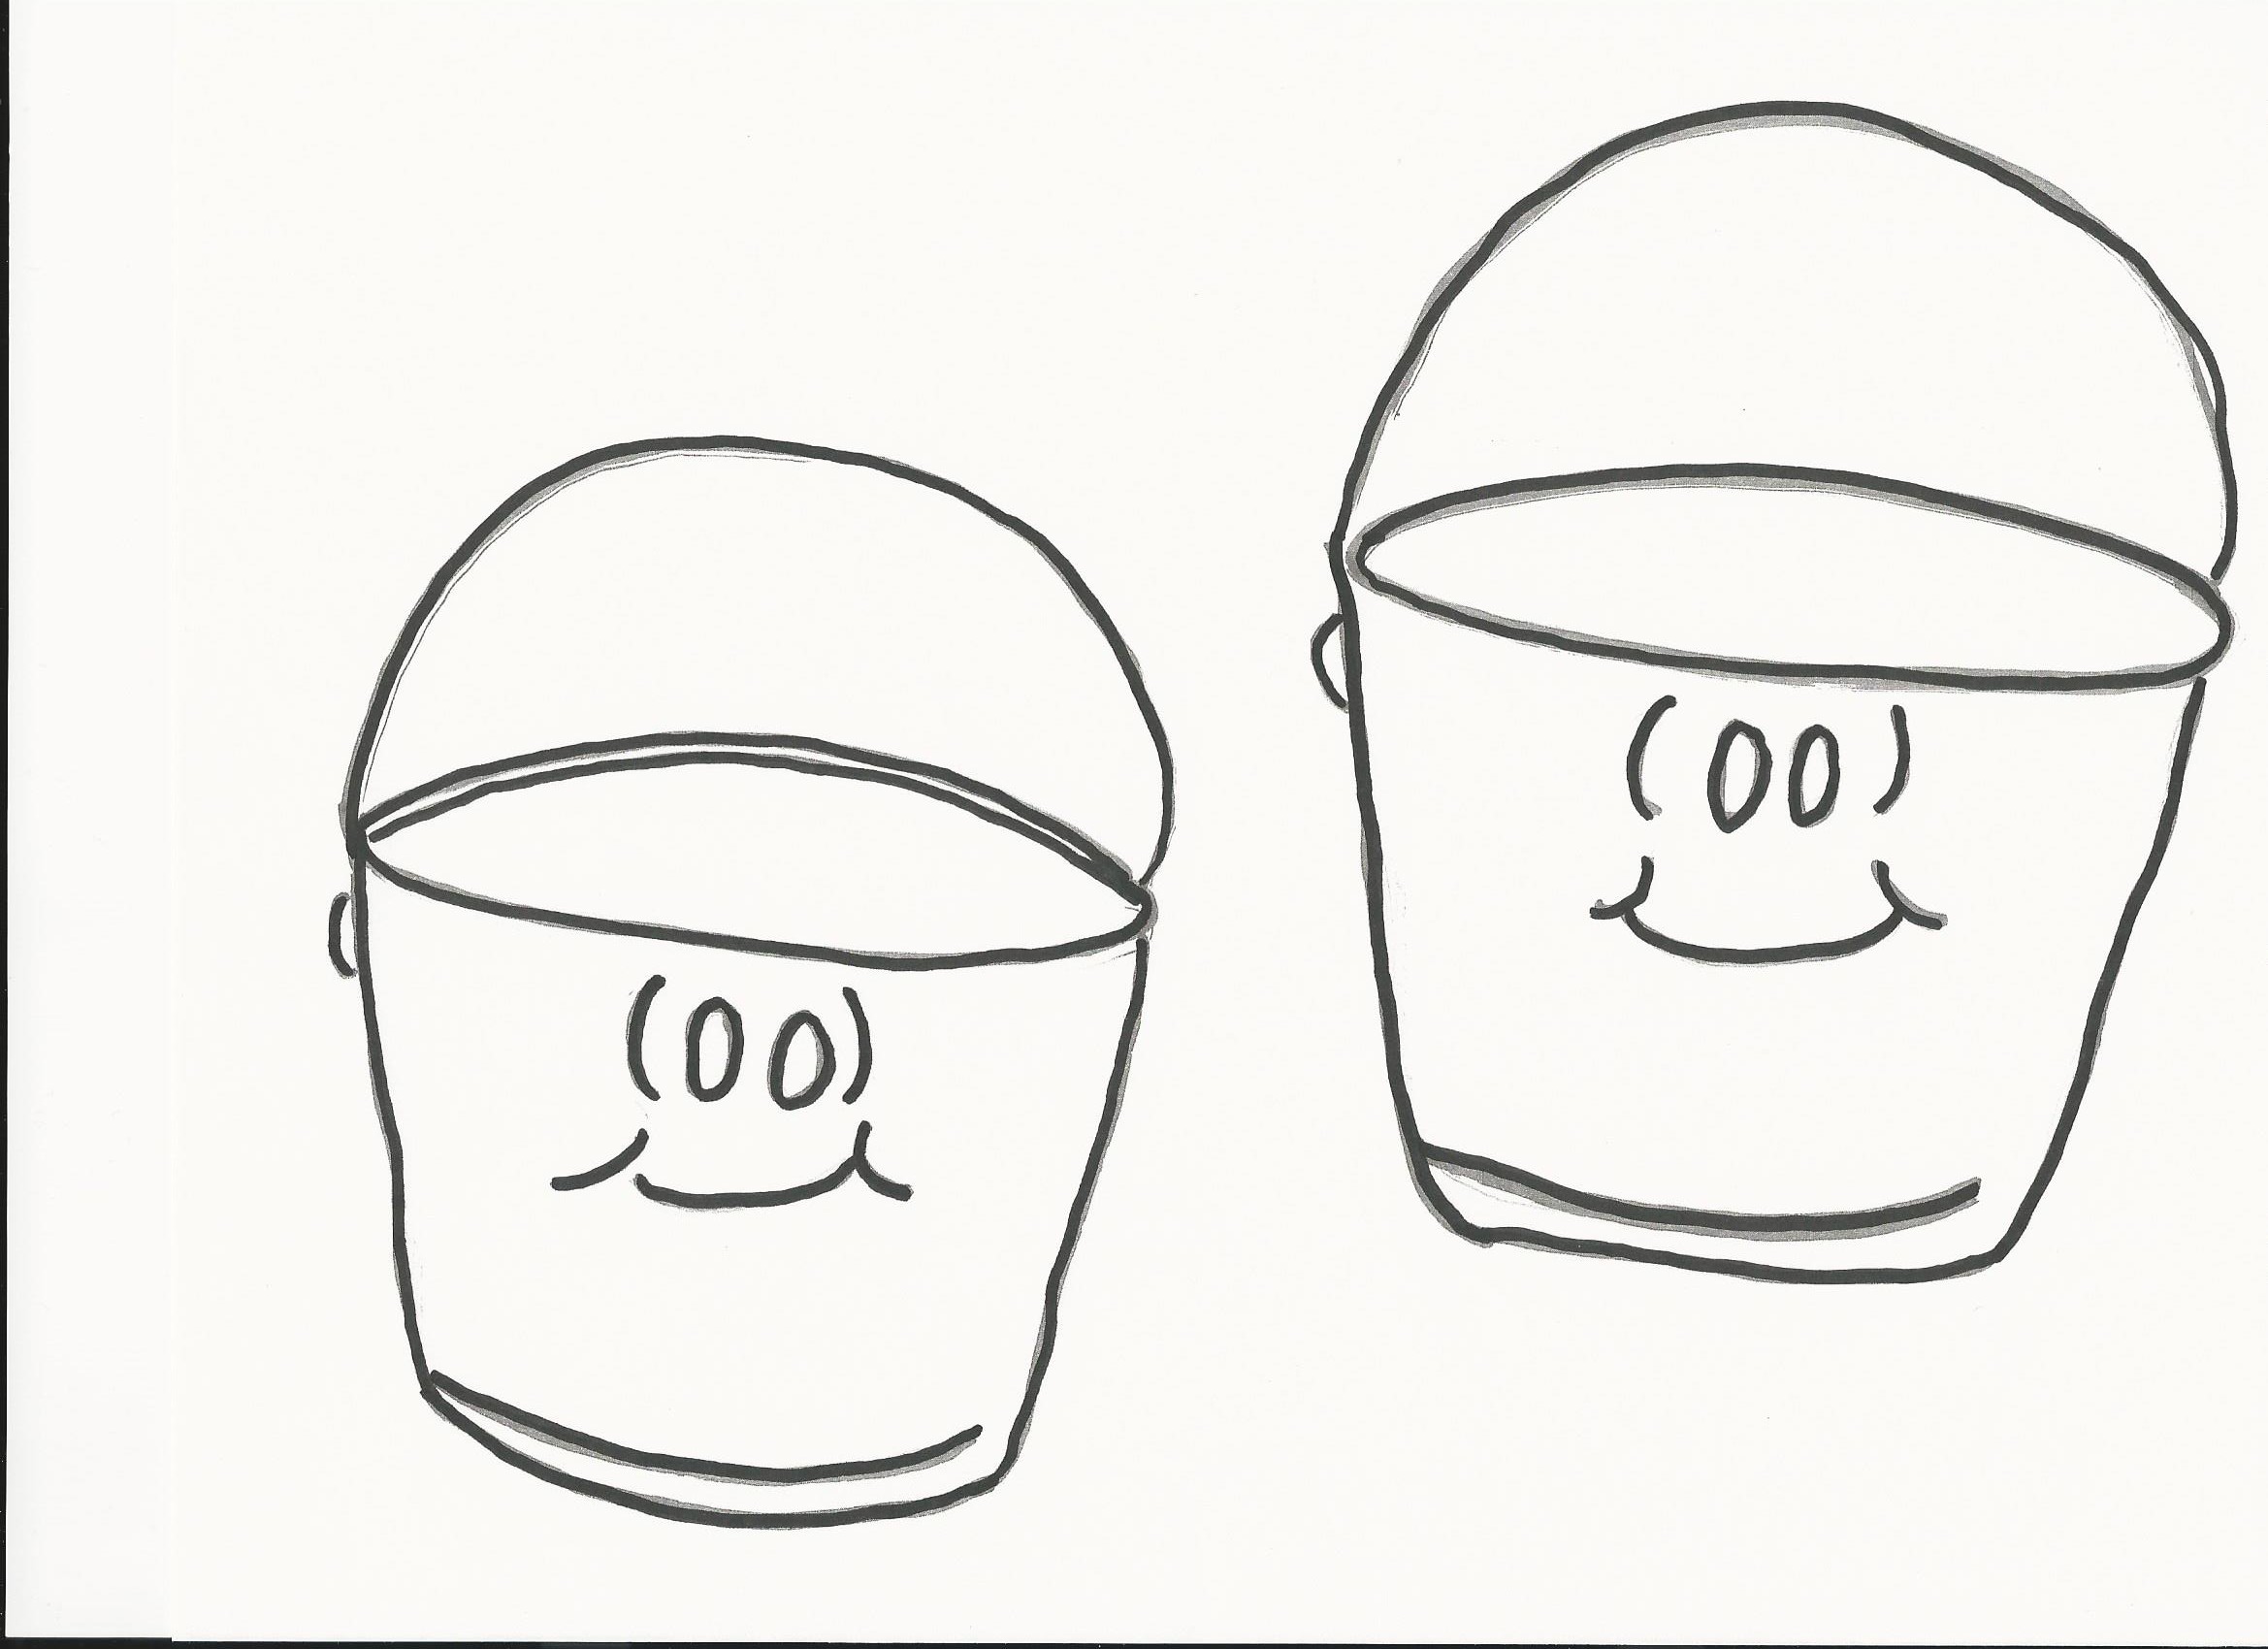
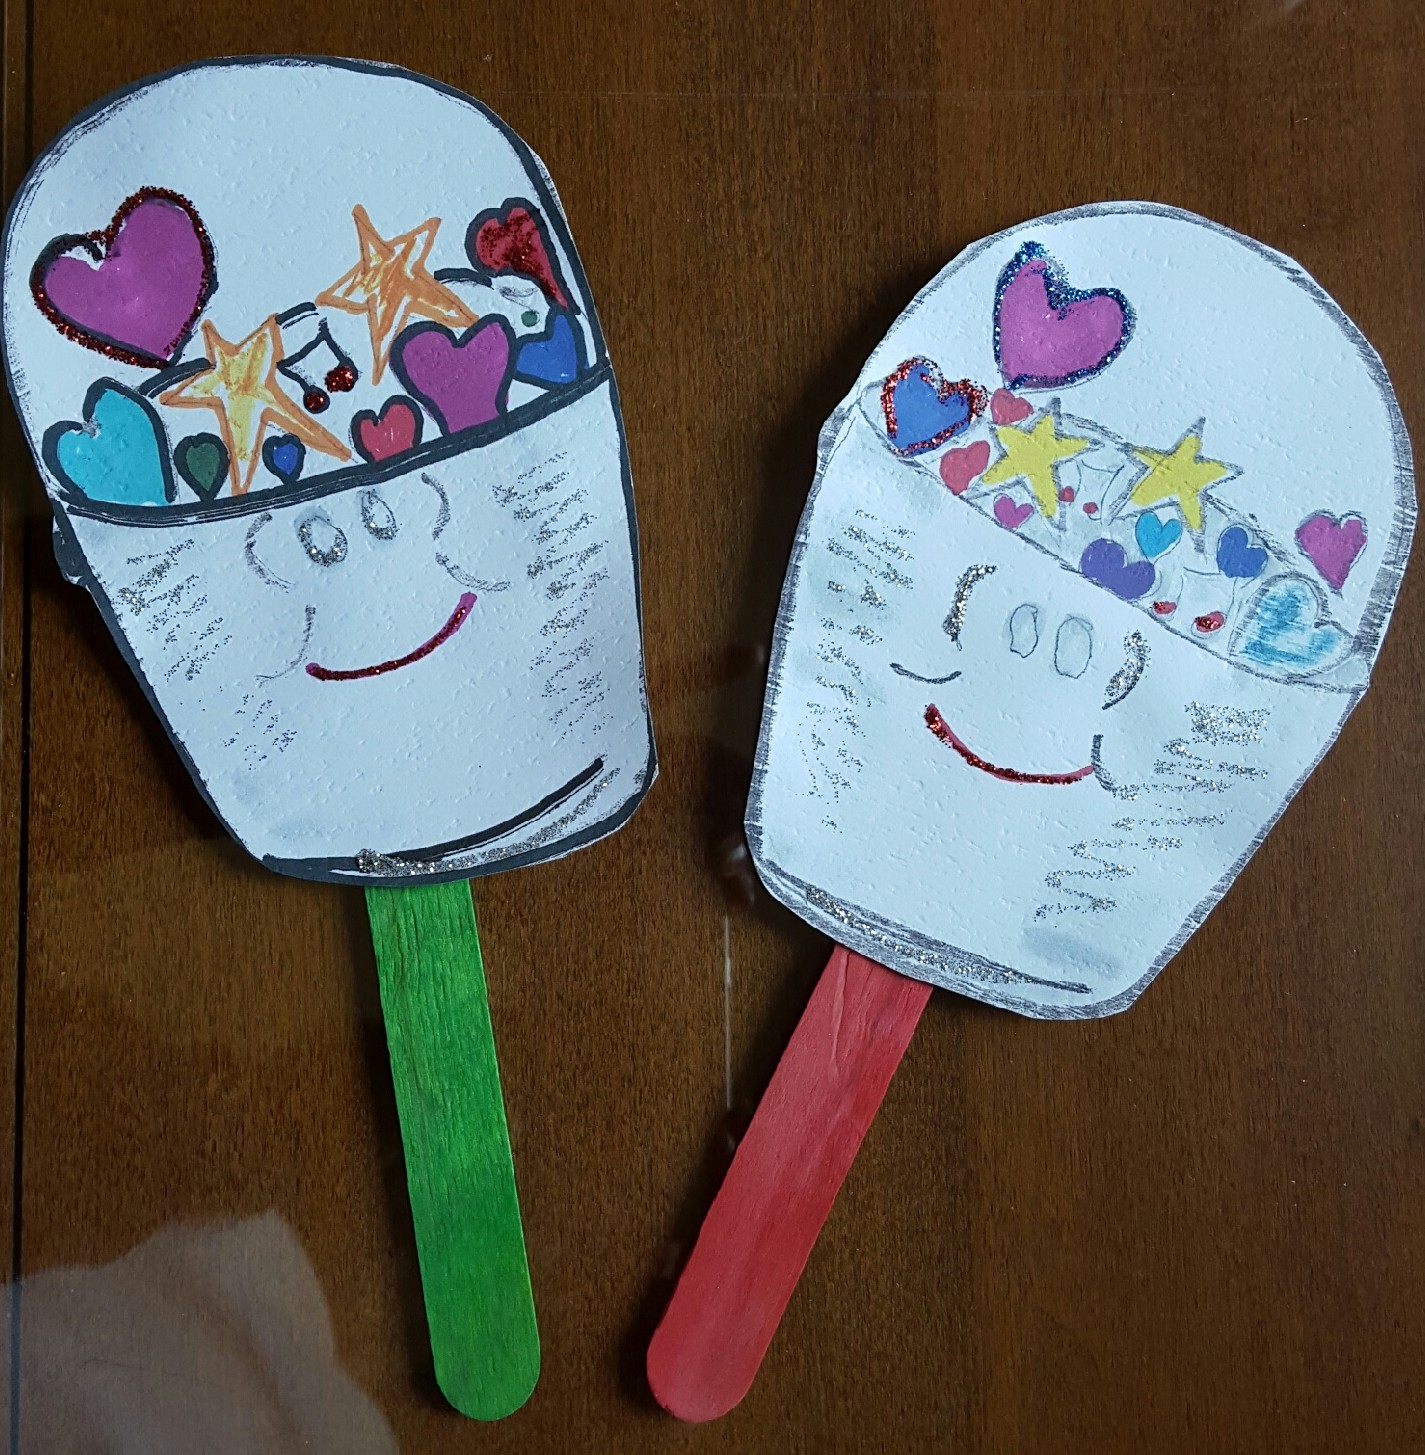
Bucket Hat
This activity is designed to help children recognize and understand that everyone has a bucket. It helps them to focus on others instead of themselves. It is easy to fill our friend's bucket, but what about a person we don't often play with or know very well? What if we get a new student in the classroom?
For Younger Students
Materials:
Construction paper long enough to fit around a student's head (roughly 23" long x 5 " high)
The pattern for the bucket (see below)
Markers, glitter, crayons, or paint to decorate construction paper and bucket
Activity:
Play the song, "Everybody Here Has a Bucket".
Give each student long construction paper and have them draw stars and hearts to decorate on the one side. Remind them that they are making hearts and stars because they are the symbols used for filling a bucket.
Give each student a copy of the pattern for the bucket and have them fill the bucket with hearts and stars. Then have them write thier name on their bucket. *See below for more ideas about name writing.
Glue bucket in the middle of the long construction paper. Wrap the long construction paper around the student's head so it fits snug and staple the two ends together (just like making a birthday crown).
Students wear their crown with attached bucket for the day so that others may see their bucket and yet they are not looking at their own bucket that is on their head.
While students are still wearing their bucket crowns, play the song again and teach students the motions to go along with the songs.
*Have students write their name on their bucket with glow in the dark paint. Hold the painted name under a lamp light for about 30 seconds to a minute. Once everyone is wearing their bucket crown, play the song, "Everybody Here Has a Bucket" and when the second line is sung, "Everybody's bucket shines bright", switch the light off so that their names glow and continue to play the song. You can do the motions to the song during this time.
For Older Students
Materials:
Have student's bring in a cloth headband (sweatband).
Tongue depressors
The pattern for the bucket (see below)
Tape
Activity:
Play the song, "Everybody Here Has A Bucket".
Have each student pick or draw a name from a class list. It should not be their name.
Give each student the pattern for the bucket.
Using glitter, markers, etc., decorate the bucket filling it with hearts and stars. Then write the student's name that they were assigned on the bucket.
Underneath that person's name they should write a word or a few words that describes that person. Examples: "always happy" "caring" "kind' "strong artist" excellent mathematician" "helpful"
Tape the bucket to the top of a tongue depressor.
Have all students put their headbands on.
Each student should then slip the tongue depressor with the bucket into the headband of the student whose name they were assigned, without that student seeing what was written about him/her.
Every student must then guess what was written about them by going around and asking other students for clues. When giving clues you cannot say the word or words that are written on the bucket. Describe the word without saying the word. Two things are happening, the students are trying to find out what was written on the bucket about them and they must think of clues for the other students around them. It is nice to find out what other people think of you and fun to help out your friends.
Definition
The quality of being just, upright, and honest; showing no favoritism or prejudice.
Literacy
1. The story The Little Red Hen by Jan Brett
2. The story The Little Red Hen Makes a Pizza by Philemon Sturges
Materials Needed
The song, “Fairness”, from the recording, Bebop Your Best
Read the original story, the Little Red Hen, and have a discussion about who and what was fair in the story.
Activity:
Bring a pan of brownies or some cans of play dough to the class. Tell the class that there are not enough for the whole class so not everyone will get some. When the students say that it is not fair (don't worry, it will happen) then ask the class what could be done to make it fair. This could turn into a great math lesson to figure out how they are going to divide the goodies so everyone gets a fair share!
Follow up this activity by reading The Little Red Hen Makes a Pizza
Play sing and teach the song, Fairness to the class. Be sure to go over with the students the vocabulary and the expressions that are included in the song (Ex. “The truth will come to light” and the “answer is right before your eyes”).
Materials Needed
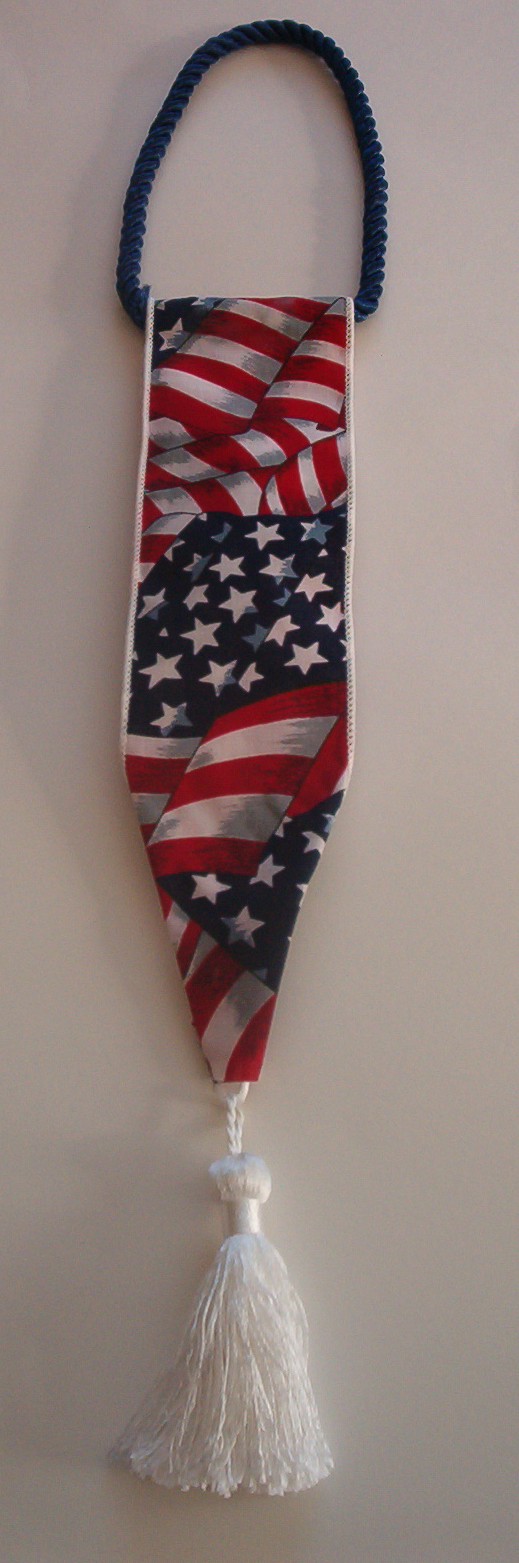
“Grand Old Flag” from the recording, Red Grammer's Favorite Sing Along Songs
To make one flag banner you will need:
Wire edged ribbon with a flag design on it that is at least 2 ½” wide and 20” long
Blue cord for handle, 17” long
White tassel
How to make a Flag Banner
(Picture at bottom of lesson.)
Lay out the 20” wire edged ribbon so the backside is facing up. At the half way mark of the ribbon, place the ends of the blue cord so that they overlap. Glue the ends of the cord together and glue it to the back of the ribbon. Now fold the ribbon in half so that the glued part of the cord is no longer visible and you see the design side of the ribbon. Lay the white tassel near the end of the ribbon (the opposite end of where the blue cord is). Glue the tassel down to the ribbon. Now fold the corners of the ribbon over the tassel and glue down. This becomes the back of your flag banner.
Students can do the following movements to the song “Grand Old Flag” holding the banner by the blue cord:
(Children are standing in a straight line. They are holding the flag banners in their right hand, down by their waist.)
“It's a grand old flag”
On the word “grand” the kids move the banner forward and away from their body.
“It's a high flying flag”
On the word “high” the kids move the banner up into the air, over their heads, with their arms straight up.
“And forever in peace may she wave”
While the banner is still up in the air, the kids move the banner left to right, back and forth.
“She's the emblem of the land I love” The kids march (and will continue to march in place till the end of the verse) in place while still waving the banner over their heads.
“The home of the free and the brave”
The kids cross arms in front of chest, and then extend hands outward and then to the sides.
“Every heart beats true for the red, white and blue”
The left hand goes back down to the side. The right hand brings the banner up to the chest and beats the heart.
“Where there’s never a boast or brag”
As hand continues to beat chest, shake heads no to show never a boast or brag.
“Should old acquaintance be forgot”
The children turn themselves in a circle.
“Keep your eye on the grand old flag”
The children raise the flag back up into the air and hold it there.
Repeat. At the end of the song, push the banner up as Red repeats “keep you're eye on the…” On the third time the kids leave the banner up in the air.
Variations
1. Instead of in a straight line, the children can be in a circle facing the outside of the circle. When it's time to march, the circle can move. When they get to “every heart beats true” the circle can stop and the students can march in place.
2. Older students would be able to do it in a circle facing the outside of the circle. Instead of moving the circle when the marching begins, have the students pass the banners around the circle. They can continue to do that until they get to “every heart beats true.”
There are many more things you can do with this lesson. For example, you can add a star to the flag banner that holds a picture of the student. They could take it home to use it as a doorknob decoration. You could display them on a bulletin board with the American flag included. Please keep in mind that there is a lot of flag etiquette for our national symbol. I thought of putting the banners or stars right on an American flag but that is not proper flag etiquette. (You should go to www.usflag.org/flag.etiquette.html to find all the standards of respect for our country's flag.)
While at the NAEYC in NYC, some wonderful teachers at our workshop displayed a flag made by student’s hand prints. They used red hand prints for the stripes and blue hand prints for the star area.
Materials Needed
1. A box of instant mash potatoes.
2. A gravy bowl or gravy ladle.
3. Three white poster boards that when cut into quarters you get 12 (14” x 11”) boards. You will need 11 of the (14” x 11”) boards.
4. The song, Gratitude, from Red Grammer's recording, Bebop Your Best.
5. Markers, a hole punch and yarn.
Teacher Preparation
1. At the end of the song, Gratitude, Red and children sing the word thank you in different languages (see list below). Write each thank you on the white board with one color marker (one on each board). Write the country origin underneath in a different color marker:
Thank you ( English)
Gracias (Spanish)
Danke (German)
Merci Beaucoup (French)
Arigato (Japanese)
Komawoyo (Korean)
Shukran (Arabic)
Salamat (Tagalog – Philippines)
Ngiyabonga ( Ndebele- Zimbabwe)
Kia Ora (Maori – New Zealand/Australia)
Thanks a lot
2. After writing the words on the white boards turn the board over and punch 2 holes (one on each end) at the bottom of the board. Put enough string through the holes so that the board will fit over a student’s head. Each student will be wearing one sign but it will hang on them backwards and upside down (in other words you can't read the sign while it is hanging on the front of the student). When it comes time in the song to show their sign the student will flip it up so that everyone can see what is written on the sign. The reason for a sign on each student is so that their hands are free to participate in the movements for the song and each student can easily raise the sign up when it is time.
3. When it is time for the students to actually sing the song to a visitor in your classroom, either have the CD queued to the last part of the song where the “thanks you” in different languages are sung or tape that part of the song and have it ready on a cassette.
Activity
This activity is designed to have students show gratitude to visitors that come to your classroom. If you have room mothers come in or a special reader for your class the students can thank them in a very special way. This lesson is set up for 10 students. You can easily adjust it to the number of students in your room by just adding more thank you signs.
1. The 10 students line up in two rows of 5 facing each other. The student at the front of line A has a box of instant mash potatoes in his/her hand and is closest to the guest in line A. The student in front of line B has a gravy boat or ladle in his/her hand and is closest to the guest. The signs are around their necks with the words facing away so that they cannot be seen. With the very young students it does not matter if the signs are in the same order that the thank you’s are sung on the recording. With older students you might want to put them in order. You will understand what order to put them in as you proceed through the steps to this lesson.
2. As the children sing, “If you pass me the mash potatoes”, line A sways away from the guest and stops on the word “me” then swings or sways toward the guest and stops on the word "potatoes”. The student with the box of potatoes hands it to the guest. Line B is standing still through this part but is singing along with line A.
3. As the children sing, “and remember to put the gravy on the side”, line B turns away from the guest (it doesn't matter how many times they spin or turn) with their hands over their heads. They spin away from the guest until the word “gravy” then spin toward the guest until the word “side”. On the word side everyone in line B motions with one hand like they are pouring gravy and the student with the gravy boat or ladle hands it to the guest. Line A is standing still but singing along with Line B.
4. As the children sing, “I’m so grateful, so incredible grateful” Line A and Line B are facing each other one on one and they shake hands first with their right hands and, still holding the right hands, extend their left hands and shake hands. Their arms should be in a crisscross as they are shaking hands.
5. As the children sing, “Thank you, thank you, thank you”, they face partners for the first Thank you and say thank you in sign language; they face anyone else in the line for the 2nd thank you and say thank you in sign language; they face the guest for the last thank you and say thank you in sign language. NOTE: The sign language for thank you is: right hand is open and finger tips are touching your chin. left hand is open and away from the chin about a foot or so. The right hand moves away from chin and gentle drops and hits the left hand.
6. Now turn on the queued music for the thank you signs. It first starts by playing marching music. The 2 students at the front of the line march in place (these are the students that handed the guest the ladle and box of potatoes). The other students march so that last student in each row comes forward and others follow so that they are now all in one straight line facing the guest. As the “thank you's” are being sung the students hold up their signs one by one all the way down the line. This is quick so younger students may not be able to sing with the recording and their signs may not be in the exact order but it doesn’t matter. The guest will see all the thank you cards and understand that the students have sung "thank you" in different languages.
Extension
1. You could have the students write the words “Thank you” and sign them on a small piece of paper. The notes could be put in the gravy boat so the guest will be able to have them. But be careful that the student “pouring” with the gravy boat during the song doesn’t tip it too much or they will dump out.
2. You could add a thank you treat to the gravy bowl for the guest to take with them.
3. This activity could be done at the end of a spring/winter concert, Mother’s Day, Grandparent's Day etc.
Materials:
1. brown construction paper
2. large white or yellow rolled paper
3. construction paper in fall colors
4. glue, scissors, markers or pencils
5. The song, Gratitude from the recording Bebop Your Best by Red Grammer.
Procedure:
1. Play the song Gratitude and have students listen for things to be grateful for.
2. Take the class for a walk and have students observe the trees in the neighborhood.
3. As a group have students tear brown paper and paste to white paper to form the trunk of a tree.
4. With help from the teacher or from a partner, trace hands on fall colored construction paper.
5. Have students draw or write what they are grateful for.
6. Glue or tape the hands ("leaves") to the tree trunk.
7. Play the song Grateful and have students sing along when the grateful tree is completed.
Materials:
The song, Headin' On Down to the Barn from Red Grammer's award-winning recording, Down the Do Re Mi
Click on Heading On Down to the Barn and it will bring you to another lesson for this song that includes glove puppets. The glove puppets may also be used for this movement lesson.
Motions:
|
First Verse: Long ago, I grew up on a farm |
Arch one hand in a rainbow form towards the back of you. |
|
Eight years old heading down to the barn |
Hold up 8 fingers then point thumb behind you. |
|
5 o’clock each and every day |
Slowly raise your left hand with 5 fingers stretched out. |
|
The animals knew I was on my way |
Right hand has first 2 fingers in an upside down V to be used like feet walking. Have the two fingers on the right hand walk down the left arm starting at the inside of elbow down to the finger tips. |
|
With some milk, some feed, and a bale of hay |
Reach down with your left hand like you’re lifting a heavy pail of milk. Still pretending you’re holding the pail of milk, reach down with your right hand and pretend you’re lifting a heavy bucket of feed. Then pretend to use a pitch fork to dig into the hay and throw it over your shoulder |
|
I always knew they were happy to see me |
Hands open on either corner of your mouth with a big smile. |
|
Chorus: The cat meowed |
Pulling pretend whiskers. |
|
The dog went, “woof” |
Hands are open and fingers are pressed together with palms facing out. Put them up by your head for dog ears. As you make the dog ear motion say, “woof” |
|
And the horse went, “phbbbbb” when he stomped his hoof |
Head down and shake it while saying, “phbbbb” and then stomp one foot. |
|
And the turkey gobble-gobbled |
Hands under your armpits like you are flapping your wings, just like in the chicken dance! |
|
And the cow went, “mooooo" |
Each hand has the first finger and thumb make an L shape (the right hand will have a backward L). Place your L shaped hands on top of your head to make cow horns*. At the same time your chin is down and raise your head up while saying “Mooo” |
|
And the itty-bitty baby went, “boo-hoo hoo” |
Pretend to cradle a baby in your arms and then rub underneath your eyes with a closed fist like you are rubbing away tears. |
|
‘Cause he was hungry, too! |
Rub your stomach. |
|
Second verse is the same as the first only hold up 9 fingers for “9 years old” |
|
|
Chorus: same as above |
|
|
Third verse: same as the first verse but the final line is “Hey Dad” they were happy to see me!” Then repeat chorus as above. |
Cup hands like a megaphone to show you are yelling “hey Dad” then point to yourself with a big smile. |
*Most domestic cows (yes, female cattle) have horns. Cattle that lack horns naturally are referred to as polled. In most breeds, this is a recessive trait. However, some breeds -- Polled Herefords, for example -- are naturally hornless. So why do you see so many cows without horns? The farmers remove the horns. This is a management technique; cows often live in crowded conditions. And it's also easier to get a cow's head into a stanchion for milking (the cow, not her head) if she has been de-horned.
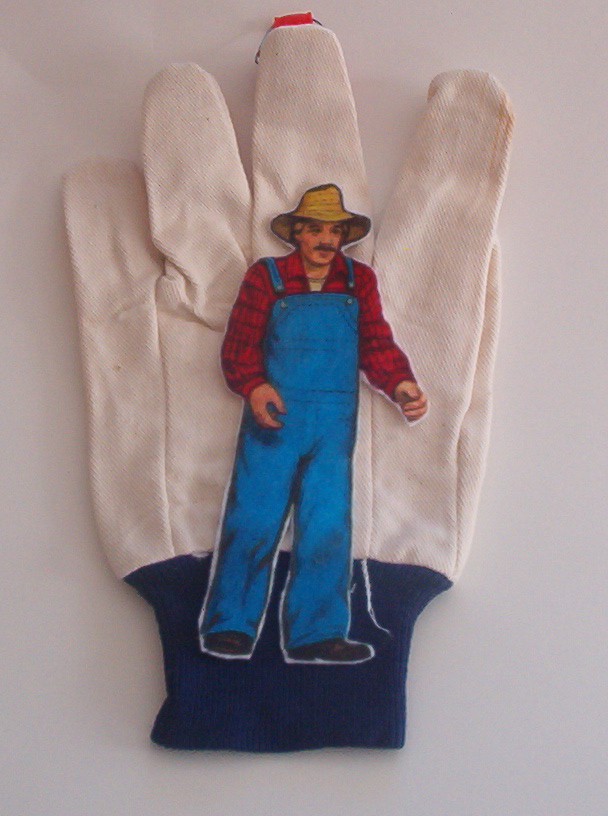
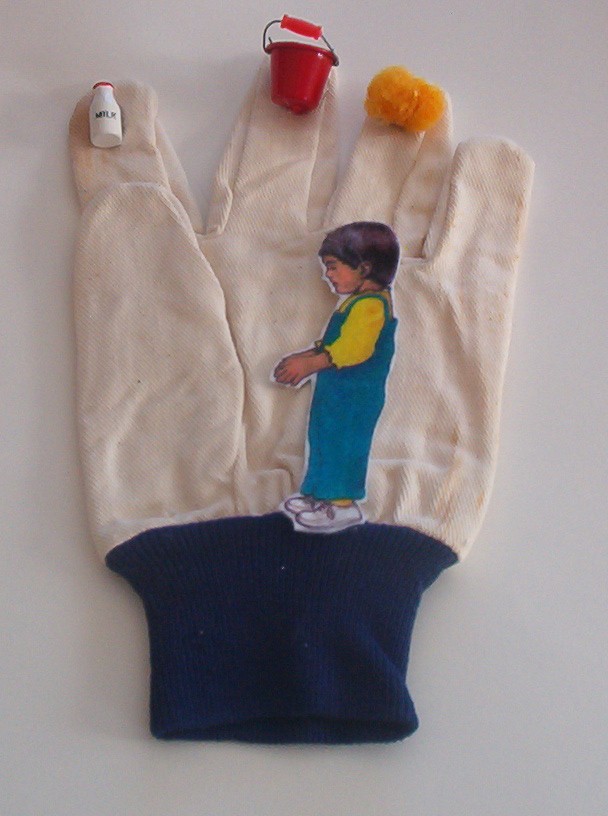
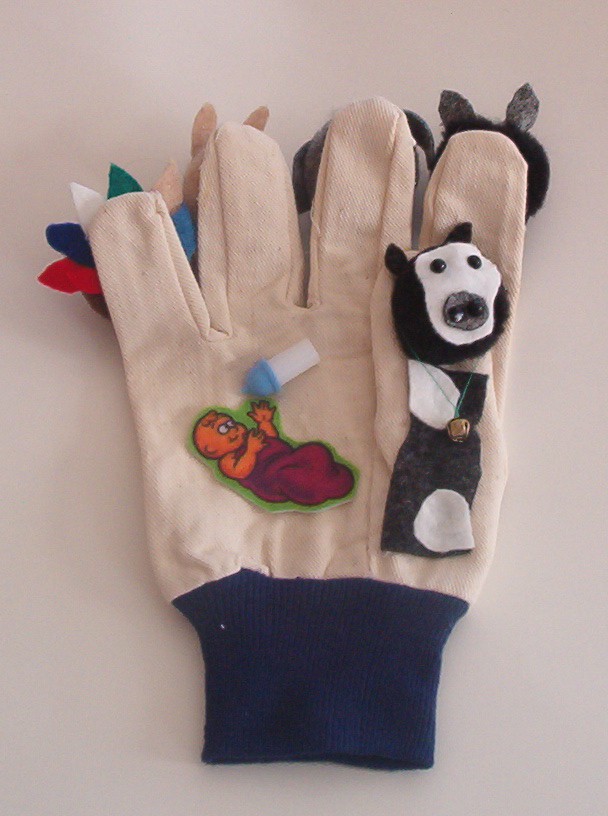
Materials Needed
The song, Headin' On Down to the Barn, from Red Grammer's recording Down the Do Re Mi
A pair of gardening gloves which you can find at hardware stores and many craft stores
Felt
Jumbo box of craft pom poms – animal assortment
6 mm ½ round black beads for eyes (they usually come 50 count)
Miniature house collection milk bottle
Miniature house collection pail
Miniature baby bottle (found in craft stores in decorating cake section)Picture or drawing of a baby Picture or drawing of a small boy in farm overalls
Picture or drawing of a farmer
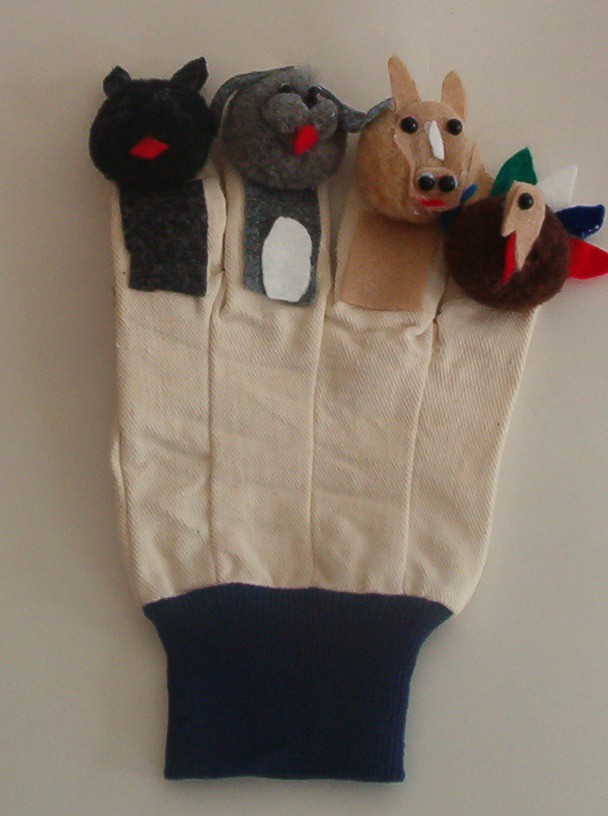
To make Glove Puppets:
1. On the right hand glove, use pom poms, felt, and ½ round black beads to make a cat, dog, horse, turkey, and cow as shown in the picture. Be sure to have all the animals on the back of the glove (back hand). The cat should be on the index finger, the dog on the middle finger, the horse on the ring finger, and the turkey on the pinkie. The cow goes on the thumb. I added a little bell around the cow's neck.
2. Still on the right hand glove, on the palm side glue the picture of the baby and the baby bottle.
3. On the back of the left hand glove, glue the picture of the farmer. On the palm side of the glove, glue onto the index finger the milk bottle, on the middle finger glue the pail, and on the ring finger glue two tiny gold pom poms glued together for the bail of hay. On the palm of the glove, glue the picture of the small boy in farm overalls.
Procedure
1. While playing the song “Headin' On Down to the Barn” you will use the glove puppets. You wear the gloves during this procedure. Start with both gloves behind your back. I usually sway back and forth while Red is singing the beginning of the song until the line “the animals knew I was on my way.” When Red starts to sing “some milk, some feed, and a bail of hay,” I raise my left glove in a fist, fingers facing the audience. When Red sings “some milk,” I raise the index finger. When Red sings, “some feed,” I raise my middle finger while keeping my index finger up. When Red sings “and a bail of hay,” up goes the ring finger as well. As Red sings “I always knew they were happy to see me,” I show the whole inside of the glove to show the small boy and I move my arm to show that the boy is moving down to the barn.
2. On the chorus, my left gloved hand goes behind my back. My right hand glove comes up in a fist with my fingers facing toward me and the back of my hand facing toward the audience. When Red sings, “when the cat meowed,” put the index finger with the cat up. When Red sings “and the dog went 'woof!'” put the middle finger with the dog up. When Red sings “and the horse went 'phbbbbbbb' and stomped his hoof” put the ring finger with the horse up and I usually stomp my foot as well. When Red sings “and the turkey gobble-gobbled,” put the pinkie with the turkey up. When Red sings “and the cow went 'moooo'” I give a big moo and show the cow.
3. As Red gets to “and the little bitty baby went boo-hoo-hoo,” I turn the right hand glove so the palm is facing out, showing the baby, and waving my hand left to right.
4. Repeat for the second verse and chorus.
5. On the last verse, I start with the farmer all grown up and then flip my glove to show the son eight years old on the palm. Repeat the rest as before.
6. After you've done this a couple of times, the kids can shout out the animals and the sounds that they make while you use the puppet gloves. Then I have kids take turns giving one child the left glove and another child the right glove.
7. Older kids could probably make their own puppets to use.
Each daily lesson should take about 30 minutes.
Day One: Listen to the song Hooray for the World and follow along with lyrics that have been written on a large chart paper. Discuss living and non-living things. Using large chart paper, classify things from the lyrics of the song that are living and non-living.
Day Two: Listen and follow along with the lyrics of the song. When finished, make a class big book ... students tell things that they are happy to have in the world.
Hooray for the World, ________ is glad that _______ is on it.
Earth Day Connection: How can we take care of the earth? List some different ways of taking care of the earth — recycling, taking care of trees and plants.
List all the animals that Red sings about in Hooray for the World. Discuss which ones live above or below the ground and which ones live in or out of water. Have students trace and cut out one of the animals in the song. Paste it on paper. Have the students draw the habitat for that animal.
| [ ] | 41 kB |
Materials Needed
1. “Hooray for the World!” – From the recording Teaching Peace
2. 10 Shirts – Large man's short sleeved button down white shirt with a pocket
3. The following animals:
These can either be store bought, made by the students, or brought in by the students. (I used TY Babies® and bought slugs in the fishing department of Wal-Mart™)
|
• Buffalo |
• Beaver |
• Bug |
|
• Bee |
• Bear |
• Poodle |
|
• Jellyfish |
• Bat |
4. The following foods or containers that would have these foods:
|
• Stick of salami |
• Empty container for Chinese food with chopsticks |
|
• Wedge of cheese |
• Bagels with lox |
|
• Bottle of maple syrup |
• Corn on the cob |
|
• Basket of mulberries* |
• Bag of miniature size boxed raisins |
* I can never find mulberries, so I use cranberries
5. Artwork for the following people:
|
• Mom |
• Aunt |
• Gramps |
|
• Dad |
• Brother |
• Neighbors next door |
|
• Uncle |
• Sister |
• Kids down the street |
|
|
• Grandma |
|
(You can use the pictures that we've provided at the end of this lesson, the children can draw their own person, or you can have the children bring in a picture of that person for each shirt.)
Preparation
Each shirt will have one animal and one person to go with it. I like to number the shirt on the inside of the neckline.
Shirt #1 needs a buffalo in the pocket & the Mom on the back of the shirt.
Shirt #2 needs a bee in the pocket & a Dad on the back of the shirt.
Shirt #3 needs a jellyfish in the pocket & an Uncle on the back of the shirt.
Shirt #4 needs a beaver in the pocket & an Aunt on the back of the shirt.
Shirt #5 needs a bear in the pocket & a Brother on the back of the shirt.
Shirt #6 needs a bat in the pocket & a Sister on the back of the shirt.
Shirt #7 needs a bug in the pocket & a Grandma on the back of the shirt.
Shirt #8 needs a poodle in the pocket & a Gramps on the back of the shirt.
Shirt #9 needs a slimy slug in the pocket & Neighbors next door on the back of the shirt.
Shirt #10 needs a slimy slug in the pocket & Kids down the street on the back of the shirt.
Procedure
1. 10 children with the 10 shirts line up left to right and face the audience. The shirts are buttoned down the front and the animals should already be in the pockets. For little children I would make big pockets on the front of the shirt so that the animals can go in and out easily.
2. Put on the song “Hooray for the World!” As the first verse begins, #1 will pull out his buffalo, dance with it, show it off, etc. Follow through until you get to #9 and 10. These children will pull the slimy slugs out of their pockets and wave them in each other's faces as if they are trying to scare each other.
3. For the chorus: As Red sings the children will do the following movements. “Hooray for the World! I'm glad to be on it” – punch up with right hand fist, and repeat 2 more times. “We've got mother nature and the human race” – clap hands, bring up, and to their sides.
4. For the food verse, you will have students in the audience. When their food is mentioned, the children stand up, holding up their item of food. When you get to raisins in a box, the student tosses them out to the audience (Kids love that!).
5. Repeat the chorus.
6. The children are still up on stage standing left to right. When Red starts to sing “We've got moms…” the first child turns around to show the Mom on the back of the shirt. Follow procedure all the way down the line. All children remain with their backs to the audience until Red gets to the line where he sings, “Everywhere you go you've got new friends to meet.” This is when all 10 children turn back to the audience, waving to them.
7. Repeat the chorus.
People Pictures
Click on the images below to see a large image. You can print the large images.
 |
 |
 |
 |
|
Mom |
Dad |
Uncle |
Aunt |
 |
 |
 |
 |
|
Brother |
Sister |
Grandma |
Gramps |
 |
 |
||
|
Neighbors |
Kids Down |
| [ ] | 64 kB |
Dove Wings
Play the song “I Think You're Wonderful”. When the song is finished talk about all the ways you can be wonderful. You can be a wonderful teacher, parent, sister, brother, aunt, uncle, mom, dad, neighbor, friend, employee, etc. Ask the students to think about all the ways they are wonderful to so many different people. Give each student the body of a dove. Have them trace and cut the body of a dove out. As the student lists all the ways they are wonderful the teacher writes those words on the body of the dove. Next have the students trace their hands (they may need help) and cut them out. These are the wings to the dove. Ask them to list all the wonderful kinds of people in their lives. Their responses are endless ... mom, day, uncle, aunt, grandfather, mailman, cousin, brother etc. Then have the students glue the hands to the body of the dove to show how these wonderful people are connected to them. This activity may take a few days and may be with some help from home. Other songs by the Grammer's that could be used with this project are Teaching Peace and With Two Wings. When this activity is complete you can hang the doves in your classroom or hang them up on stage for an assembly program.
A Wonderful Flower
A Lesson for Grade levels K-1 (Could be modified for preschool)
Each lesson should take about 30 minutes.
Day One: Brainstorm on a chart what a friend is or what friends sound like when they are talking to each other. Sing and teach students I think You're Wonderful. Write the lyrics out on chart paper for the students to follow along. Discuss the words from the song. Check the brainstorming sheet to see if any lyrics from the song match the things that they thought of for showing friendship. Point that out to students.
Day Two: Sing song and role-play things students could say to each to make them feel good. Use lyrics from the song and ideas students came up with on Day One (chart).
Day Three: Play and sing song. Using magazines and large poster board, have students find pictures of people who are showing friendship and kindness. Students work in cooperative groups of 3-4 or in pairs. Cut out pictures and glue onto poster board. A variation would be to give groups of students a circle that is going to be the center of the flower. Write the word Friends in the middle. Have students cut out petals and think of describing words for friends (wonderful, caring, appreciative, loyal, etc) and write those words on the petals. Glue the petals around the center of the flower. Add stems/leaves and hang on bulletin board that looks like a garden of friendship.
Day Four: Students sing and read lyrics from song. Then students share posters they made on day three with other students in their class.
Materials:
- camera
- construction paper
- sign language for the chorus to I Think You're Wonderful (see below)
- rings to bind construction paper together.
- The song, I Think You're Wonderful from Red Grammer's recording, Teaching Peace
Chorus:
- I think you're wonderful
- When somebody says that to me
- I feel wonderful
- As wonderful can be
- It makes me want to say
- The same thing to somebody new
- And by the way I've been meaning to say
- I think you're wonderful, too
Chorus with Signs:
In the chorus above the underlined words are the words that you will sign in the song.
Listed below is how to sign those words
I Pinkie pointing up, hand is placed at the chest.
Think point to your temple
You're point away from yourself
Wonderful Throw both open hands up, palms facing forward
Says The index finger, pointing to the left, is held in front of the mouth and rolls forward in a circular movement.
Me point to yourself
Feel Place the tip of the middle finger against the chest with the other fingers extended; draw it up a short distance.
Be The letter "B" is held against the mouth. Move it away from the mouth, still in an upright position.
Makes Right fist on top of left fist; Turn them in opposite directions and strike them together again. Repeat several times.
Want Place both curved hands in front of you. palms up and draw them toward you several times.
Somebody Hold up the right index finger and shake the arm back and forth slightly, left to right. Palm side may face forward or self.
New The left hand open hand faces up;the back of the right open hand brushes across the heel of the left from right to left.
Way Place both open hands in front of you, fingers pointing forward and palms facing each other; move both hands forward with a slight zigzag motion.
Meaning Right hand makes a "V" like "victory". The fingertips of the right handed "V" are placed against the left open hand, the "V" facing out; the "V" is turned and again placed into the palm, the "V" facing in.
Too Pinkie and thumb are out; move hand forward and backward.
Procedure:
- Play the song, I Think You're Wonderful, for students to learn.
- Teach the students the sign language to the chorus of I Think You're Wonderful.
- Take a picture of students performing the sign language to I Think You're Wonderful and glue the pictures to construction paper.
- Hang the pictures on the bulletin board in the correct order.
- Later on, take the pictures down and put them together with rings to form a book. Students can take turns bringing the book home to share with their families.
NOTE: A teacher form Philomath, OR sent this idea to Red. If you would like to share one of your classroom activities using Red Grammer's songs you can send it to maria@redgrammer.com
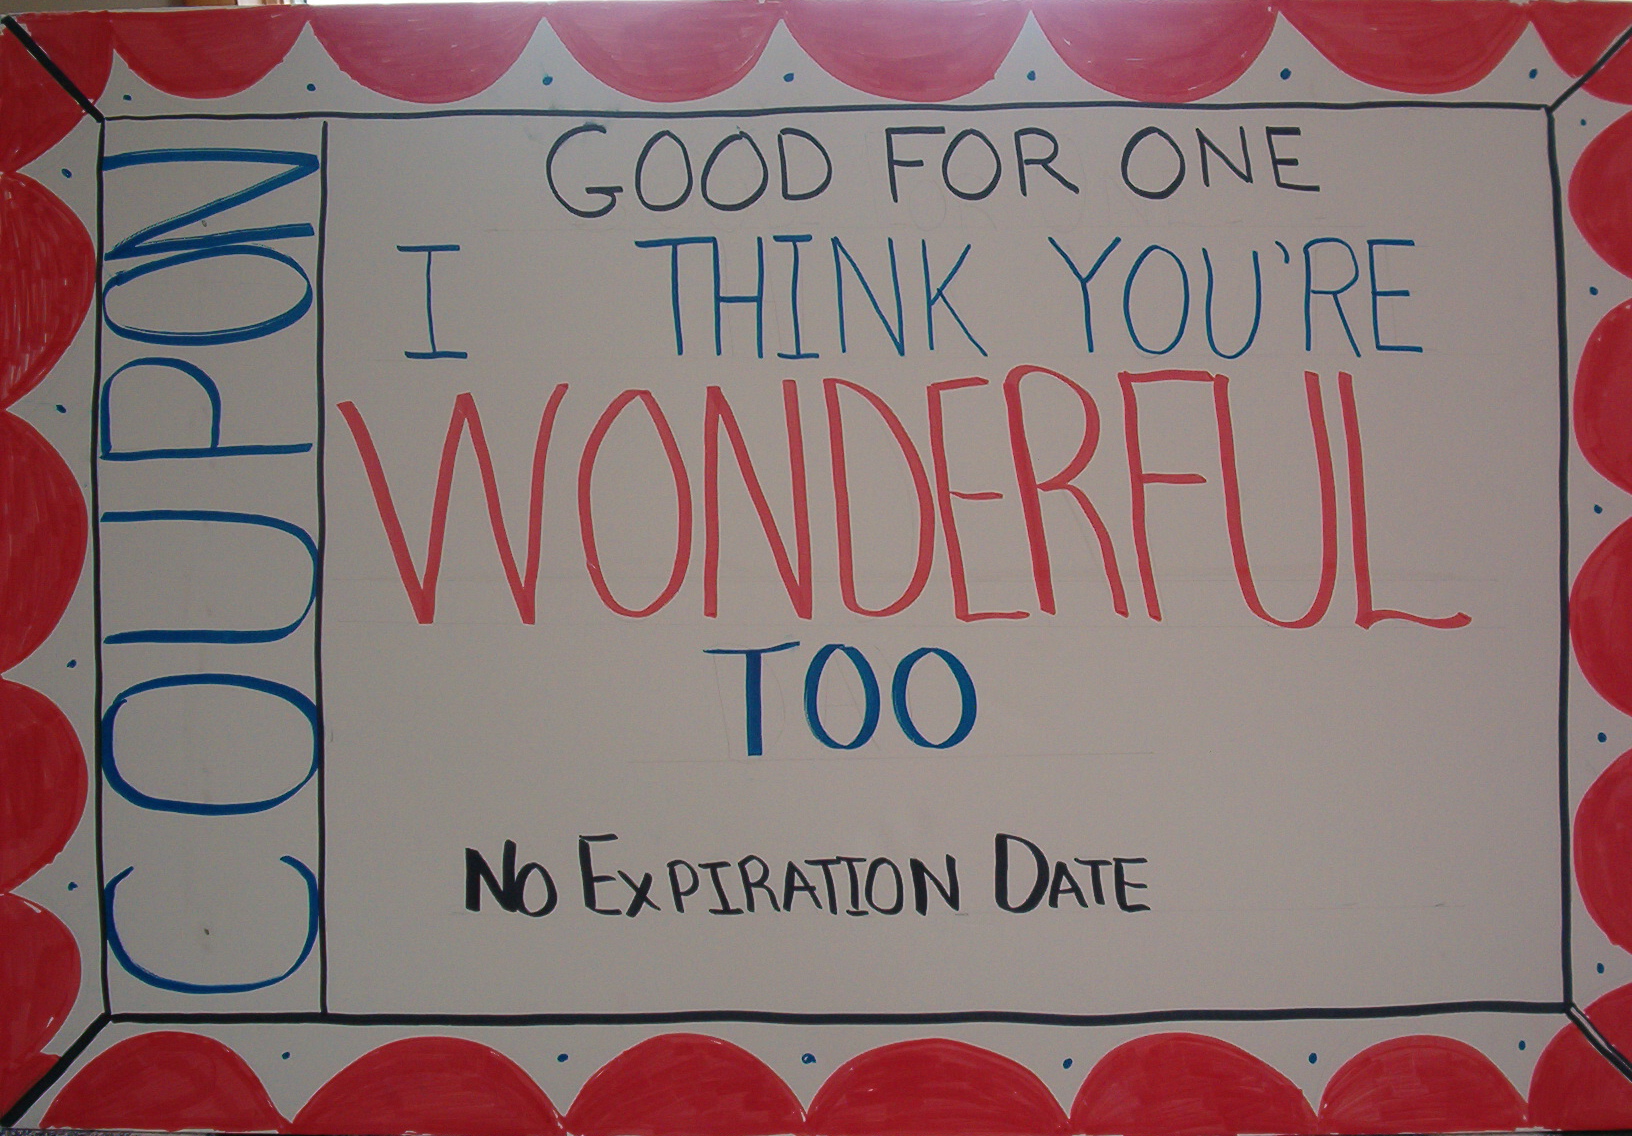
I Think You're Wonderful Coupon
Coupons
Coupons can come in all shapes and sizes. I have made little ones, 8 x 10s, and even poster sized coupons when I want to really emphasize how wonderful someone is.
Materials Needed
Poster board and colored markers
Kraft Paper Kids
Materials Needed
Large rolled paper, the kind that you can trace a child's body on, double the length of one child's body
Crayons, Scissors, Markers
Small heart-shape stencils
Some kind of available stuffing, I used old rags, but you could use newspaper, shredded paper, pantyhose, material, etc.
Children's clothing
1. Have kids lay on the paper that is folded in half so that when you cut it out, you are cutting out the body two times. Trace around the child. Cut out the body. Staple or glue all around the edges until its almost closed and then stuff it and finish closing. The body will now have a 3-D effect.
2. Have students bring in their own clothing. They will need a top, a bottom, and foot apparel. Some kids like to add hats or jewelry.
3. Have the kids draw their own faces on the body. I've seen kids add their birthmarks, nail polish, unique hair coloring, etc. While they are doing this, you could be playing “I Think You're Wonderful.”
4. At another time, play “I Think You're Wonderful” for the students and have a discussion about what wonderful means.
5. Ask every student in class to list something wonderful about each and every student. For example, Johnny is in your class and you ask all the students to tell something wonderful about Johnny. Do that for every child in the class.
6. Have each student trace and cut enough hearts for every student in the class. So if you have 12 students, each student needs to cut out 12 hearts.
7. Either the teacher or the student writes something wonderful about every student in the class. Then you take all the wonderful things said about Johnny and pin them all over Johnny's cutout body and clothing. Then, fix the cutout bodies so they are in the chairs where the students normally sit. Now the students are ready for open house.8. When parents come to open house, they not only see the cut-out body of their child, but they also get to read all the wonderful things the class says about their child.
"I Think You're Wonderful" notes and coupons
(This is an on-going lesson and an example of an “I Think You're Wonderful” coupon follows this lesson)
1. Play “I Think You're Wonderful” and discuss the song with the class.
2. The teacher goes around the room and says something wonderful about each and every student.
3. On another day, the teacher plays “I Think You're Wonderful,” has a student stand up, and has the other children say something wonderful about this student. You can continue to go around the room or do another child each day.
4. The teacher slips “I Think You're Wonderful” notes to the students in the class for a period of 1-2 weeks.
5. The teacher hands out “I Think You're Wonderful” coupons and then asks the students to pass them on to someone else in the class.
6. Students are now instructed to pass the “I Think You're Wonderful” coupons to other people in the school, such as secretaries, custodians, other students, principals, nurse, etc.
Kraft Paper Kids
Materials Needed
Large rolled paper, the kind that you can trace a child's body on, double the length of one child's body
Crayons, Scissors, Markers
Small heart-shape stencils
Some kind of available stuffing, I used old rags, but you could use newspaper, shredded paper, pantyhose, material, etc.
Children's clothing
1. Have kids lay on the paper that is folded in half so that when you cut it out, you are cutting out the body two times. Trace around the child. Cut out the body. Staple or glue all around the edges until its almost closed and then stuff it and finish closing. The body will now have a 3-D effect.
2. Have students bring in their own clothing. They will need a top, a bottom, and foot apparel. Some kids like to add hats or jewelry.
3. Have the kids draw their own faces on the body. I've seen kids add their birthmarks, nail polish, unique hair coloring, etc. While they are doing this, you could be playing “I Think You're Wonderful.”
4. At another time, play “I Think You're Wonderful” for the students and have a discussion about what wonderful means.
5. Ask every student in class to list something wonderful about each and every student. For example, Johnny is in your class and you ask all the students to tell something wonderful about Johnny. Do that for every child in the class.
6. Have each student trace and cut enough hearts for every student in the class. So if you have 12 students, each student needs to cut out 12 hearts.
7. Either the teacher or the student writes something wonderful about every student in the class. Then you take all the wonderful things said about Johnny and pin them all over Johnny's cutout body and clothing. Then, fix the cutout bodies so they are in the chairs where the students normally sit. Now the students are ready for open house.8. When parents come to open house, they not only see the cut-out body of their child, but they also get to read all the wonderful things the class says about their child.
Musical/Mirroring Bucket Filling Cups
For Older Students
Materials:
- Plastic cup for each student
- Semi-circle Styrofoam ball
- Construction paper
- Patterns for stars and hearts
- Pipe cleaners
- Hole punch
- Toothpicks or make slits in Styrofoam
Preparation:
- Trace stars and hearts and cut out
- Glue Styrofoam semi-circle into top of cup
- Add the hearts and stars to the cup by either setting the stars and hearts into slits in the Styrofoam ball or attach toothpicks to hearts and stars and push the toothpicks into the Styrofoam ball
- Punch 2 holes opposite each other at the top of cup
- Slip one end of pipe cleaner in one hole and the other end of the pipe cleaner into the other hole so that the pipe cleaner becomes the handle to the bucket.
Activity:
- Play the song, "I'm All Filled Up" and point out how the children repeat what Red sings.
- Have students listen to the beat that plays in the background.
- Have students pair up or get into groups and create some background music to the song with their cups. Kids love to play cups to music. They can come up with some really good sounds. The cup sounds could be played during the repeated phrases sung by the children in the song.
- Have students share with the rest of the class.
For Younger Students
Materials:
Same as above
Preparation:
Same as above
Activity:
- Tell students that they are going to play the mirror game using their cups (buckets).
- Play the song and the teacher moves the cup a certain way while Red sings the line. The students imitate the teacher's move while the children on the recording repeat Red's line. Do this a couple of times.
- On the same day or on another day, have the students sit in pairs facing each other. this time they take turns playing the mirror game with each other using their cups while the song is playing.
Movements for “I'm Lucky”
created by Cindy Doback
adapted by Red Note Records
In 1998, the hula hoop, one of the biggest fads in history, turned forty years old. To join in the celebration your students can turn a hula hoop into a friendship ring. You will need 1 hula hoop for every 2 students and the song “I'm Lucky" from the recording, “Can You Sound Just Like Me?"
You will need one hula hoop for each group of 2 children and the song, I'm Lucky" from Red Grammer's recording, Can You Sound Just Like Me?
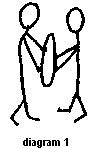
To begin, the students are holding the hoop like a steering wheel (diagram 1).
Verse 1
“The great big wheel goes round and round” - children slowly turn the wheel like you would a steering wheel.
“The sun goes up” - children bend their knees slightly and then stretch up like they are lifting the sun up to the sky. Think of the hoop like a Ferris wheel when it goes half way up.
“The sun goes down” - children come back down around bending their knees. Again, like a Ferris wheel the hoop is on the downward ride.
“We keep living day to day” - The hoop is now to be held horizontally (diagram 2) with both hands and the children spin around slowly in a clockwise direction.
“I look around and I have to say” - Turn slowly in the counter clockwise direction and stop.
Chorus
1. “I'm Lucky” - on the word “I'm” swing the hoop back to the holding position (diagram 3) and on “Lucky” swing the hoop down and then up in a big circle going all the way around and letting your body turn around with it. You will need to pivot to turn.
2. “Spending my life with you” - swing the hoop with both hands back and forth to the beat of the music. Knees are slightly bent and feet are stationary.
3. “You know I'm Lucky” - repeat 1 of chorus.
4. “And I know we're gonna make it through” - repeat 2 of chorus.
Verse 2
“There's no one else in the world like you” -one child holds the hoop like it's a frame for the other child. The child not holding the hoop acts out being the picture for the frame. The child can be creative to act out his/her own "picture”.
“And nobody does things the way you do” - repeat same movement with children swapping parts.
“I wouldn't trade you for anything” - the hoop returns to a horizontal position by the children's waist only instead of holding the hoop with their hands they hook the hoop with an elbow so that each child is facing the same direction and the hand away from the hoop is free. At the same time they are swaying back and forth slowly to the beat of the music.
“You bring a smile to my heart and you make me sing” - still swaying and hooking the hoop with one elbow, each of the children use their free hand to bring it to their face to show a smile, then touch their heart, then swing their free arm out and around and grab the hoop with both hands so as to be ready to start the “Chorus” motions.
Chorus
The chorus repeats 2x. On the last time through when you get to the words “gonna make it through” the children go inside the hoop together by lifting the hoop over their heads.
The Scoop on the Hoop!
The inspiration for the hoop was a large bamboo ring whirled by Australian kids in gym class.
The plastic American version was named the hula hoop after the hip-swiveling Hawaiian dance.
The first hula hoop sold for $1.98 in 1958.
In 1958, the first year on the market, 100 million hula hoops were sold world wide.
The plastic tubing for all the hoops ever made would stretch around the earth 5 times.
When spinning a hula hoop around your hips, speed up to make it travel up your body and slow down to send it toward your feet.
Materials Needed:
- Fun Foam visors. They can be found in Wal-Mart for .78
- Markers
- The song, It's Another Beautiful Morning from the recording, Can You Sound Just Like Me? by Red Grammer
Activity 1:
- Play the song, It's Another Beautiful Morning
- Talk about the song and be sure to mention that in the song the child "Tipped his hat to everyone" "Smiled to everyone" "Waved to the neighbors"
- Explain to children that it is important that we greet each other in a friendly way. Hal Urban, a teacher for over 35 years, greets his students in the hallway each and everyday as they enter his classroom. The students are the most polite students at the high school level and substitute teachers want to sub in his class! Hal says that he had to teach the students the basics...saying Hello in a proper way. Making eye contact. Reminding the students to say Please and Thank You.
- Prepare a script for students to take turns practicing:
Student 1: Good Morning, Mary
Student 2: Good Morning, Jamal. How are you?
Student 1: I am fine. How are you?
Student 2: I am fine, thank you.
Student 1: Have a nice day!
Student 2: Thank You. You have a nice day, too!
Student 1: Good-bye!
Student 2: Good-bye!
The students will be wearing the fun foam visors. They should tip the hat when saying good morning and tip the hat when saying good-bye.
Activity 2:
On another day talk to the students about the different ways to say "hello" in different languages. ( You can also use the Rapp Song from the Parents' Choice Award-winning recording, "Teaching Peace" for this activity).
Write "hello" in a different language on each fun foam visor. Have the students try another script using the "Hello" from their visor. After they have practiced, let them wear their hat around the building and they can greet others with their "hello" and they can tip their hat!
Definition
The quality of having good will;being unselfish and thoughtful to others
Activity 1: Kindness Cookie
Little kindnesses add up to create a sense of belonging, caring, and pride. If kindnesses are not present then nothing holds people together and a group doesn't feel like a safe, sweet place. In this Lesson a large cookie represents the class. The cookie should be plain. Tell the students that there is a character trait that can change this class from a plain cookie to one filled with sweetness. Take a container of frosting and tell the students that frosting represents “kindness” and that kindness is something that we will need to be the glue to hold our class together all year long. Then add the following kindness toppings:
“Smiling at everyone when we come into the classroom” add crush m n' m's
“Helping a classmate with a math problem”:.add rainbow sprinkles
“Cheering each other on in gym”:...add crushed peanut butter cups (if no one is allergic)
“Sharing”:...add chocolate sprinkles
“Doing nice things for each other”:..add mini marshmellows
Now you have a cookie that is filled with sweet kindness. Divide the cookie into small pieces and give a small piece to each child. Have them taste the cookie for its sweetness. Remind the students that you would like them to be filled with kindness and they will be as sweet as the class cookie!
Another way to do this is to make an ice cream sundae. We usually order dixie cups and then have the students dump the ice cream from the dixie cup into a bowl so that they can add the toppings of “kindness”.
Lyrics to a folk song from Canada
Lessons by Joan Robson, a music teacher in Liverpool, NY
You can use music to interpret a song. Children can create their own ideas about what a “mighty moose” might look like or how a lake might move. What sounds do you hear in the forest? How would you make that sound? In this lesson children decide how they can become the underlined word in the song below. It's a quick lesson on improvisation. The fun in this exercise is that each child brings his/her own unique creativity to the song and the outcome is never the same each time it is performed.
Materials
The song “Land of the Silver Birch” from Red Grammer's recording, Down the Do Re Mi
The imagination of every child
Children may choose to add props that they spy in the room.
Procedure:
Play the song, Land of the Silver Birch. Then ask the students to imagine what the underlined words would look like and sound like. Invited students up to act out the underlined words listed below. Play the song again and have the students act out their parts. You can more than one student play a part. For example you might want to have a group of children be a forest, a lowland or hills of the north.
(introduction)
(verse 1)
Land of the silver birch
Home of the beaver
Where the mighty moose
wanders at will
(refrain)
Blue lake and rocky shore
I will return once more
Boom di-de boom, boom
Boom di-de boom, boom
Wo----Wo----Wo----
(verse 2)
Down in the forest
Deep in the lowlands
My heart cries out for thee
Hills of the north
(refrain)
Blue lake and rocky shore
I will return once more
Boom di-de boom, boom
Boom di-de boom, boom
Boom di-de boom, boom
Wo----Wo----Wo----
(instrumental interlude)
(verse 1)
(refrain)
(coda)
Materials Needed:
1. Two paper bowls per child
2. Tempera paints
3. Liquid detergent
4. One yard of Rex-lace (also called gimp or boondoggle lace) for each drum that adds a bell or bead
5. The song, Land of the Silver Birch from the recording, Down by the Sea
6. Masking Tape
7. Hole punch
8. Stir sticks (you can get them from any paint store)
9. Beans or rise
10. Beads and/or bells
Procedure:
1. Ask the students to listen for instrumental sounds in the song, Land of the Silver Birch as you play the song.
2. Students paint designs on two bowls (Hint: When using Tempera paint, add some detergent for easy clean up. It also prevents the paint from cracking after it has dried).
3. Place beads or rice in bowls and glue bowls together, including stir sticks as handles. Some students will choose not to have the beads added for sound.
4. Use masking tape to seal the bowls securely.
5. To make different sounds for the drums: Teacher punches holes around the top half of the drum.
6. Teacher ties a bead or bell to one end of the Rex-lace and shows student how to begin threading rexlace leaving about 4 inches at the end before the bead or bell. This way when the drum is in a swinging motion the bead will be able to hit the middle of the bowl.
7. Student threads the holes with relax until he threads through all the holes. Teacher will then leave about 4 inches again and tie another bead or bell at that end of the Rex-lace.
8. Have students sit in groups with their drums. One group will have a drum with no beans/rice; some students will have beans/rice; some students will have beads on their drums; some students will have bells on their drums. Play the song Land of the Silver Birch again and conduct the students when to play their instrument. Give each group a chance to play alone and with other groups.
Materials
1. 5 poster boards or foam board to make a truck, motorcycle, fire engine, jet, horse (or you can make enough so that each student has one).
2. Pictures (shown below that you may use to copy onto the poster board)
3. Permanent markers
4. Hats to go along with the pictures (i.e. hard hat, helmet, fire fighter hat, cowboy hat)
5. Elastic to glue on back of boards for handles
6. The song Let's Go Riding from Red Grammer's recording, Can You Sound Just Like Me?
Draw and cut out each picture on poster board and color them or have the students color them.
Activity
1. Play the song Let's Go Riding while students dance in a circle with their vehicle.
2. When the song stops ask one of the students where they are going in their vehicle or who they are visiting today. Encourage students to do the talking and use their imagination.
*A car is not in the song “Let's Go Riding.” However, many teachers like to add verses and we added the car verse to our workshop. We have included the car picture in this lesson.

Materials
1. The song, Listen to Your Heart, from Red Grammer's recording, Bebop Your Best.
2. Scrapbook. I bought mine at a dollar store.
3. Camera for your classroom
4. Different shapes and sizes and textures of heart stickers
5. A marker or computer to type out the story for the classroom book.
6. Pictures of the following actions to go along with the character traits mentioned in this song:
• Caring – a picture of a child washing their dog
• Cooperation – 2 students playing with blocks or a puzzle together
• Sharing – one child is sharing his/her crayons with another student.
• Endurance – kids finishing a race ( I used a wheelchair race)
• Courage – a parent helping a child learn to ride the bike without training wheels.
• Responsibility – a student working on his/her homework
• Enthusiasm – a crowd cheering
• Truthfulness – a mom talking with her child. The child is holding scissors and the family cat is behind her missing some fur.
• Patience – students in a long line waiting their turn
• Perseverance – a boy/girl trying to tie shoes.
• Respect – students saying the pledge to the flag
• Compassion – one child visiting another at the hospital.
I found pictures on Google images. If you would like to have the pictures that I used you can email me at maria@redgrammer.com and I will email the file to you.
Preparation
Make a story book titled Listen to Your Heart by using the follow sentences for the story:
• Caring can be… taking the time to bathe your dog.
• Cooperation can be… working together.
• Sharing can be… letting a friend use your crayons.
• Endurance can be… finishing the race.
• Courage can be… learning to ride a bike without training wheels.
• Responsibility can be… doing your schoolwork.
• Enthusiasm can be… cheering for your team.
• Courtesy can be… holding the door open for someone.
• Truthfulness can be… telling mom you cut the cats hair.
• Patience can be… waiting in line.
• Perseverance can be… trying to tie your shoes.
• Respect can be… saying the pledge to the flag.
• Compassion can be… visiting a sick friend.
Put the first part of the sentence (the character trait on left side of the book by typing it on or putting it on with marker, and the rest of the sentence on the other side of the page with the picture that matches. I like to type it rather than use marker so that the students read the words the way they would see it in a story book.
Next
1. On each page put the message, “Listen to your heart”. I wrote out the words “listen to your” then put a heart sticker for the word heart. Make the message look different on each page i.e. different color or write it around the picture. Put it on the top or on the bottom. Mix it up so that the kids are looking for the message on each page. The hearts should all be different as well.
2. Be sure to have a title page and a dedication page so that you can teach the children about the different parts of a book.
3. On the last page begin to add some heart stickers.
Lesson
1. Play the song Listen to Your heart. Explain to the children why listening to your heart is important to learning to do the right things in life. It helps you build good character. Play the song again and list the characters that Red sings about in the song.
2. Read the book you made to the class. Read a second time and ask the children to find the special message on each page. Talk about the pictures and have the children start to connect the character trait with the picture.
3. As the school year goes on and you “catch” your students doing a character trait that is in the book take a picture of that student in action. Add the picture to the page of the book that you made. You can start to cover the pictures that are in the big with the pictures that you take of your students.
4. Each week re-read the book to your class and talk about the added pictures of the students. The idea is to have the original pictures covered up by the student's pictures by the end of the school year. Also, by the end of the school year the students will have a better understanding of the character traits. The book makes for a great display at open house.
5. You could have the students take turns in June bringing the book home to share with the family.
Materials needed:
1. The song, Monster, from Red Grammer's recording, Can You Sound Just Like Me?
2. Rhythm sticks (2 sticks per student)
3. Monster Feet (see below to learn how to make quick and easy monster feet.
4. tambourine.
Activity:
Sit in a circle with rhythm sticks.
Chorus
I am a scary monster
I am such a horrible sight
I am a scary monster
I can roar with all my might
On the first 3 Choruses
1. tap bottom of sticks on floor once
2. then tap top of sticks on floor once for 7 counts
On the eighth count it is a “one and two” count tapping the sticks together in an x-formation in front of you. Repeat this pattern to complete the chorus.
On the 3 Verses
1. tap bottom of sticks on floor once
2. tap sticks together in an x formation once
3. tap neighbor's stick on either side of you once simultaneously
4. tap sticks together in an x formation
Repeat this pattern four times, ending in a “one and two” count tapping the sticks together in an x formation.
On the last Chorus
The pattern is the same except at the end when Red holds the word “might” for 7 counts. Here you will tap the bottom of the sticks alternating left and right. On the eighth count tap the sticks together in an x formation in front of you with a “one and two” count.
A Challenging Variation
Chorus: remains the same as above
verses:
1. tap the bottom of sticks once on floor
2. tap sticks together in an x formation
3. slap right stick down on the floor by your right side in a reaching distance of your neighbor to the right
4. switch your left hand stick into your right as you pick up the stick on the floor from your neighbor to your left.
Repeat pattern 4 times.
Once the students master the pattern, give all the students the same color rhythm sticks except for one that is a different color. The students will then be able to see the one different color stick travel around the circle.
After the rhythm pattern has been taught you can introduce the monster. The "monster" comes into the center of the circle with big monster feet to stomp or dance around with. The monster makes scary faces at the students in the circle. With a tambourine the monster can keep the beat while the students in the circle continue with the rhythm pattern. Kids can take turns being the monster.
To make monster feet: Tape 2 brown grocery bags together so that one is inside the other. The bag should lay horizontally like a shoe box. Cut a hole in the top so that a child's foot can fit in. Stuff the bag with newspaper to keep it from collapsing. From a third bag cut 5 large toes and paste to end of foot. Repeat for other foot.
The sign language to “On The Day You Were Born” is included on Red Grammer's DVD/Video
Hooray for the World!
Materials Needed
“On The Day You Were Born” from Red Grammer's recording, Hello World
Artwork for:
A baby
A sun
Hands and feet
Horns
Big smiles
The art work of the items listed above is at the end of this lesson. You have permission to print and make copies of them onto large construction paper, foam board, or poster board. Use markers, crayons, or paint to color them.
Activity
The student that is being honored for his/her birthday sits in a chair holding the picture of the baby. One student stands behind holding the sun. 2 or 3 students stand to right (or left) of the birthday student holding feet on sticks. Another group of 2 or 3 are holding the smiles on sticks. Two students hold the horns and a group of 2 or 3 are prepared to be the choir.
Play the song “On The Day You Were Born” as the students sing along. As the song is playing:
1. On the day that __________ (the sun is lifted and raised over the birthday child's head)
2. ___________ was born (the birthday student holds up the baby...you can also add the name to the baby)
3. The angles sang (the choir sings “The angels sang and they blew on their on their horns” and point to the horn blowers)
4. And they blew on their horns (the 2 students raise the trumpets and blow...or use real trumpets!)
5. And they danced (the feet on sticks are moved up and down like they are dancing)
6. They smiled (the smiles come up to the faces of the students holding the smiles in their hands)
7. And raised up their hands (the hands “dance” in the air)
8. Repeat 1 and 2 for the end.


Materials:
rolled paper large enough to trace a student
markers
The song, On The Day You Were Born from Red Grammer's recording, Hello World
Procedure:
1. While the students sing, On the Day You Were Born, the birthday student is having his/her body traced by the teacher.
2. Students continue to sing until the birthday student's body is completely traced.
3. The birthday child then draws the face parts onto the traced body.
4. The traced body is then passed around the classroom and students write with marker something wonderful about the birthday classmate and sign his/her name to the statement.
5. When all the students have filled in the traced body the teacher then hangs it up on the classroom door.
6. At the end of the day the student gets to take the traced body home to share with his/her family.
NOTE: A teacher wrote in to tell Red about this idea. If you would like to send an activity using one of Red Grammer's song you can email it to maria@redgrammer.com.
From Red Grammer's recording, Hello World!
On the day you were born (3x)
(the birthday of you)
Left arm in front of chest; right hand swoops underneath the left arm and up. Left arm still in the same position and the right elbow rests on the finger tips of left hand. The index finger of the right hand is pointing up. Slowly bring the right arm down on top of left arm. For the word you just point to the person.
The angels sang
angel - Touch the tops of your shoulders with finger tips and push away and out from body
(like wings taking off)
sang - extend the left arm; pointing the fingertips of the right hand to the left palm, wave the right arm back and forth.
And they blew on their horns
Pretend that you are playing a clarinet.
And they danced, they danced
Extend the left arm; pointing the index and middle finger of the right hand to the left palm, wave the right arm back and forth.
They smiled and raised up their hands
With index fingers pointed at the middle of your mouth have fingers trace the mouth outward like you are making a smile then raise both hands straight in the air.
On the day, on the day that you were born
Repeat step 1
Definition
The act or habit of being persistent. Having the resolve to continue even when the task is difficult.
Literacy
1. The Tortoise and the Hare (a Fable)
Materials Needed
The song, “Perseverance” from Red Grammer's recording, Bebop Your Best.
Activity
As a class create hand motions to go with the chorus. The students can then practice with a partner until they succeed. Have students work with partners to create their own hand motions or use the motions that we provide here. We have provided motions that are very basic for preschoolers. Each level shown gets harder so that kids of all ages can be challenged.
Level 1
(works well with pre-school age) hand motions to be used with partner:
1. clap your own hands together one time.
2. Right hand then claps with right hand of partner one time.
3. Clap you own hands one time again.
4. Left hand claps with left hand of partner one time.
5. Keep repeating steps 1-4 all the way through the chorus. Can you do it without a mistake?
Level 2
(pre-school age through Kindergarten) hand motions to be used with partner:
1. Slap your hands on your thighs one time.
2. Clap your own hands together one time.
3. Right hand then claps with right hand of partner one time.
4. Clap you own hands one time again.
5. Left hand claps with left hand of partner one time.
6. Clap your own hands one time again
7. Keep repeating steps 1-6 all the way through the chorus. Can you do it without a mistake?
Level 3
(first grade and up) hand motions to be used with partner:
1. Slap your hands on your thighs together, one time.
2. Clap your own hands together one time.
3. Right hand then claps with right hand of partner one time.
4. Clap you own hands one time again.
5. Left hand claps with left hand of partner one time.
6. With a arms crossed in front of chest and elbows are up and hands are resting on arms, have the back of your hands come together as a clap 2x.
Level 4
The challenge!:
1. Slap your hands on your thighs together, one time.
2. Clap your own hands together one time.
3. Right hand then claps with right hand of partner one time.
4. Clap you own hands one time again.
5. Left hand claps with left hand of partner one time.
6. Hop with one foot then the other (2-step hop)
7. With arms crossed in front of chest and elbows are up and hands are resting on arms, have the back of your hands come together as a clap 1x.
Activities
1. Do a study of birds and their songs. Which ones sing high, which ones sing low, which ones sing on a telephone wire in your neighborhood? Listen to a recording of bird songs. Make a large musical staff with a telephone pole on each end. Place pictures of birds high and low on the staff. In the center of the staff put a class picture or a picture of the school chorus.
2. Create an animal chorus using pictures or stuffed animals. Have one animal in each section hold a sign that labels his part: soprano, alto, tenor, bass, etc.
3. Voice study: Bring in recorded samples of different spoken voices. Use commercials from radio or tv, books on tape, recorded poetry, or radio personalities. Most children's librarians and media centers have a good variety of spoken recordings. Listen to the recording. Discuss the differences in the voices. How do they make you feel? What do you think of when you hear them? Cartoon voices are silly, a narrator reading a mystery will sound mysterious, a narrator reading a story may also vary his voice when different characters speak. Discuss how a variety of voices add to our interest and listening pleasure.
4. Have children record a short poem or segment of a story and listen to their own voices.
5. Discuss how a voice is unique like a face… it tells us who is speaking when we hear it. Play the game “Guess the voice.” In random order, play back the recorded poems and have the children guess who's voice they are hearing.
6. Ventriloquist fun: Most children love the idea of ventriloquism. Using puppets, have the children experiment, one at a time, inventing a puppet voice and speaking without moving their lips. The easiest voice changes are to go lower or higher. Tell the children the puppet is hosting a birthday party and is greeting a guest. An easy beginning line with no m's, b's, p's, etc. is “Hi! So glad to see you. Here is a candy.” This activity can be extended to creating puppet voices and putting on a puppet show where the speakers are not seen. The emphasis then, is on the character's voice.
Costumes for “Place in the Choir” from Red Grammer's recording, Down the Do Re Mi
A group of teachers and parents got together and came up with the idea of making costumes for the students to act out the song, “All God's Critter's Got a Place in the Choir.” We focused on this particular song because we knew there would be enough parts to include a whole class or other large group. The idea was to make simple and affordable costumes that would be comfortable and durable. When we were designing the costumes we were very careful to use patterns that would allow the children's faces to be seen. If you have any questions about how to make a particular costume please feel free to call us at 1-800-824-2980 and ask for Maria.
Bullfrog : Cut out 2 pieces of an egg carton and paint them green. Hot glue eyes on to the egg cartons and then hot glue the egg carton to a green visor hat. Using the bullfrog pattern (found below), trace the frog's webbed feet on either green construction paper or green fun foam (the fun foam is more costly than construction paper but the costume can last from year to year). With a hole puncher, punch 2 holes at one end of the frog foot so that a child can slip his shoelace through the hole and tie it to his/her shoe. For the hands you can use pipe cleaners and grip it around the child's wrist. Green stockings and a green t-shirt can complete this costume.
Hippopotamus : Using gray construction paper or oak tag painted gray, draw a hippo head like the one found below. Hot glue a tongue depressor to the bottom of the mask. Attach a long thin gray tail, made of felt, near the bottom of a gray t-shirt.
Cow : Paint black spots all over a white t-shirt. Using felt, stuff and sew on pink felt utters. You can use the cow pattern (found below). Tie a ribbon around a cow bell for the child to wear around the neck.
Dog : Paint dark brown spots on a light brown t-shirt. Add a tail using felt or the pipe cleaners that come extra thick and extra long. The pattern for the dog ears (found below) can be made from construction paper or brown material. We like to use the material because they can be used over again.
Cat : Use a head band and hot glue on some black felt pointed ears. On the back of a black t-shirt add a tail by using construction paper or long extra thick pipe cleaners.
Honeybee : Twist 2 black pipe cleaners around a black head band so that the pipe cleaners are hanging out. Add a black fuzz ball on each of the pipe cleaners to make the antennae. Paint a white t-shirt with black and yellow stripes.
Cricket : Make and paint a fiddle and bow out of oak tag (or use a real or toy fiddle). Make the antennae just like you did for the honeybee only use brown instead of black. From a brown paper bag or brown fun foam cut a triangle for the head and paint large black eyes on each side leaving the side with one point for the nose. Have the head band hold the face mask in place. Finish this costume by having the student wear a brown t-shirt.
Donkey : Out of gray construction paper or gray corduroy material cut the ears (same pattern as the dog ears). Using 3 strips of gray corduroy material (about 12” long) braid them together and attach to the back of a gray t-shirt for a tail. Fray the bottom of the tail.
Pony : Use a pony stick (Hobby Horse).
Coyote : Cut ears (pattern found below) out of gold construction paper and glue to thin elastic head band. Have student wear gold t-shirt with red bandanna around neck. Cut a moon shape out of yellow construction paper or oak tag and attach to string. The coyote comes out on stage holding the moon up in front of him/her and howls at the moon.
Hoot owl : Gather 2 yards of brown sheer material in the middle and sew to the back of a brown t-shirt at the neck line. Sew a tiny bit of material onto each sleeve of the t-shirt to help hold the material in the right spot. Where the material falls to the side, sew on a wrist band so that it can slip through the child's wrist. Now when the student flaps his/her arms the material will move up and down just like wings. The mask was made from a paper plate. Strips of brown construction paper (like a row of icicles hanging from a house, pattern found below) were cut and layered on the paper plate. White eyes and a pointed orange beak were added. The paper plate is then glued to an elastic head band.
Jaybird : This costume is made the same way as the hoot owl only use blue sheer material instead of brown. The t-shirt is white so that you can glue some blue feathers around the front of the neck.
Duck : Glue some yellow feathers to a yellow visor. Add a duck bill (We found ours for 25¢ in a Halloween store. We have also seen them in nature stores). Make the orange webbed feet out of the same pattern that you used for the bullfrog. To finish this costume we added a yellow rain slicker.
Possum : Attach a baby possum (pattern found below) made out of light brown fuzzy felt with a pink pipe cleaner tail, pink felt ears, and a pink felt nose to a light brown t-shirt. Attach pink felt curved ears to a black head band. (We found the nose for 25¢ at the same Halloween store.)
Porcupine : Tie three 5” pieces (2 brown and 1 black) of creative twist paper together in a knot that is in the middle. You will need to make 100 or more of these. Using safety pins, pin each knot to the outside of a white t-shirt. Tie about 10 to the top of a head band. If you want to be biologically correct with this animal then the creative twist knots should be on the back and not the front of the t-shirt.
Fox : Take a burnt red t-shirt and hot glue some light brown fur (we bought a boa from a Halloween store) to the neck and add a long piece of fur to back for the tail. Make the ears from the same pattern that you used for the coyote and hot glue a little fur to the inside of each ear.
Ox : Make the bull's horns from brown construction paper or fun foam and hot glue to a head band. Make a yoke from brown construction paper or fun foam to put around the student's neck. You could top this costume off with a brown t-shirt and a ring for the nose.
Grizzly bear : Cut a large oval piece of light brown fuzzy felt. Sew the felt to the middle of a dark brown sweatshirt (we also stuffed the felt with shredded paper for extra padding). Make the ears out of the brown fuzzy felt and hot glue to a head band.
Alligator : Using the picture (found below) as a guide, cut the alligator head about 16” long from eyes to bottom of mouth. Glue on wiggly eyes. On the back of each eye section glue a small piece of pipe cleaner so that they eyes will bend forward and stay in position. Take white pipe cleaners and bend into the shape of teeth and hot glue on to top and bottom of mouth. Punch holes near mouth and slip pipe cleaners through to attach to child's fingers. Punch 2 more holes between eyes and slip pipe cleaners through to attach to child's arm.
Hawk : The same pattern as the hoot owl only the head will be long and pointed.
Raccoon : Gray t-shirt, with a raccoon cap, and a black mask.
Turtledove : Use the same idea as the hoot owl only the colors are gray and peach.
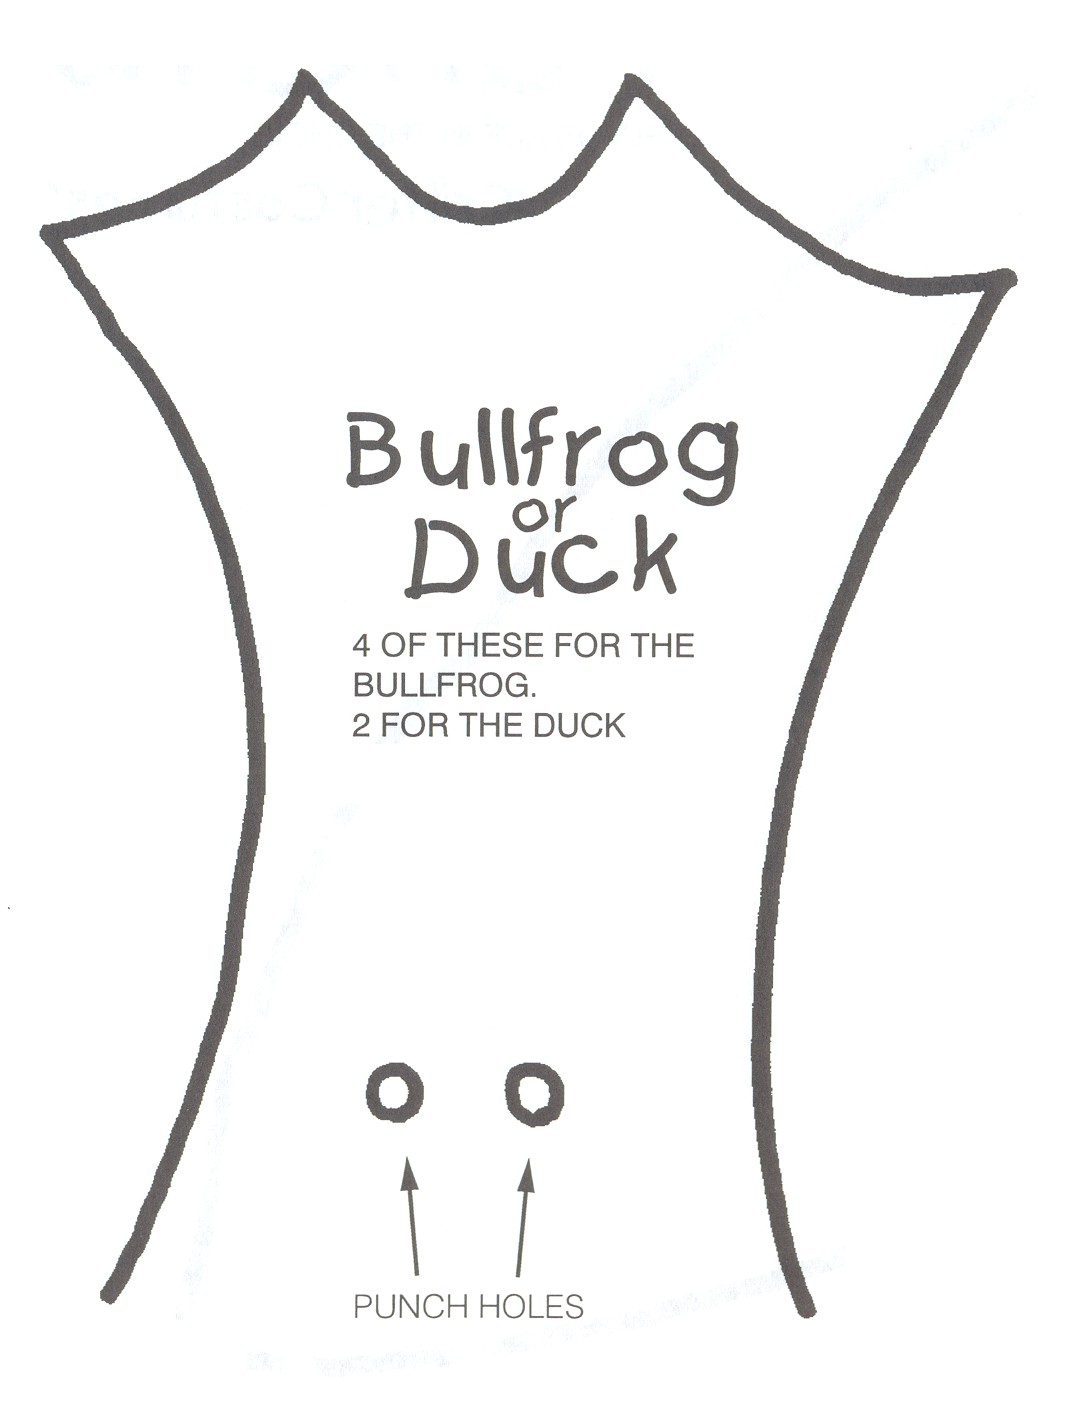
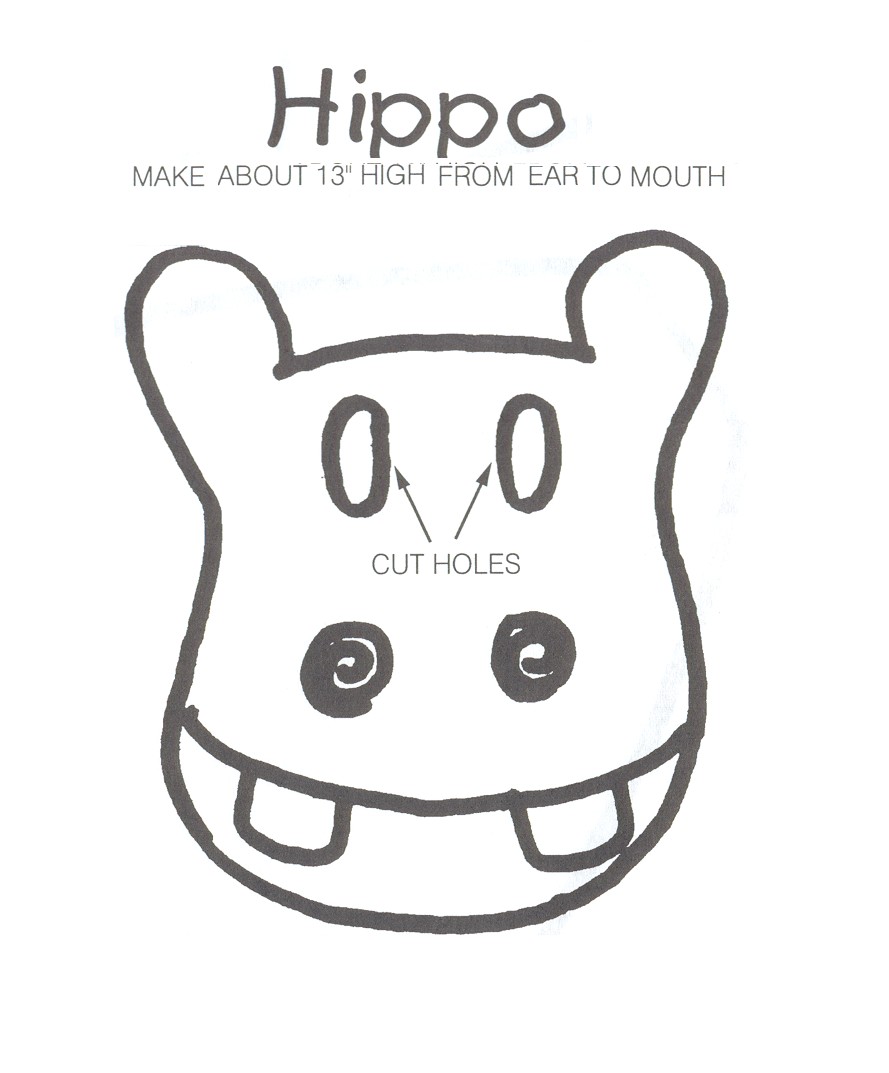
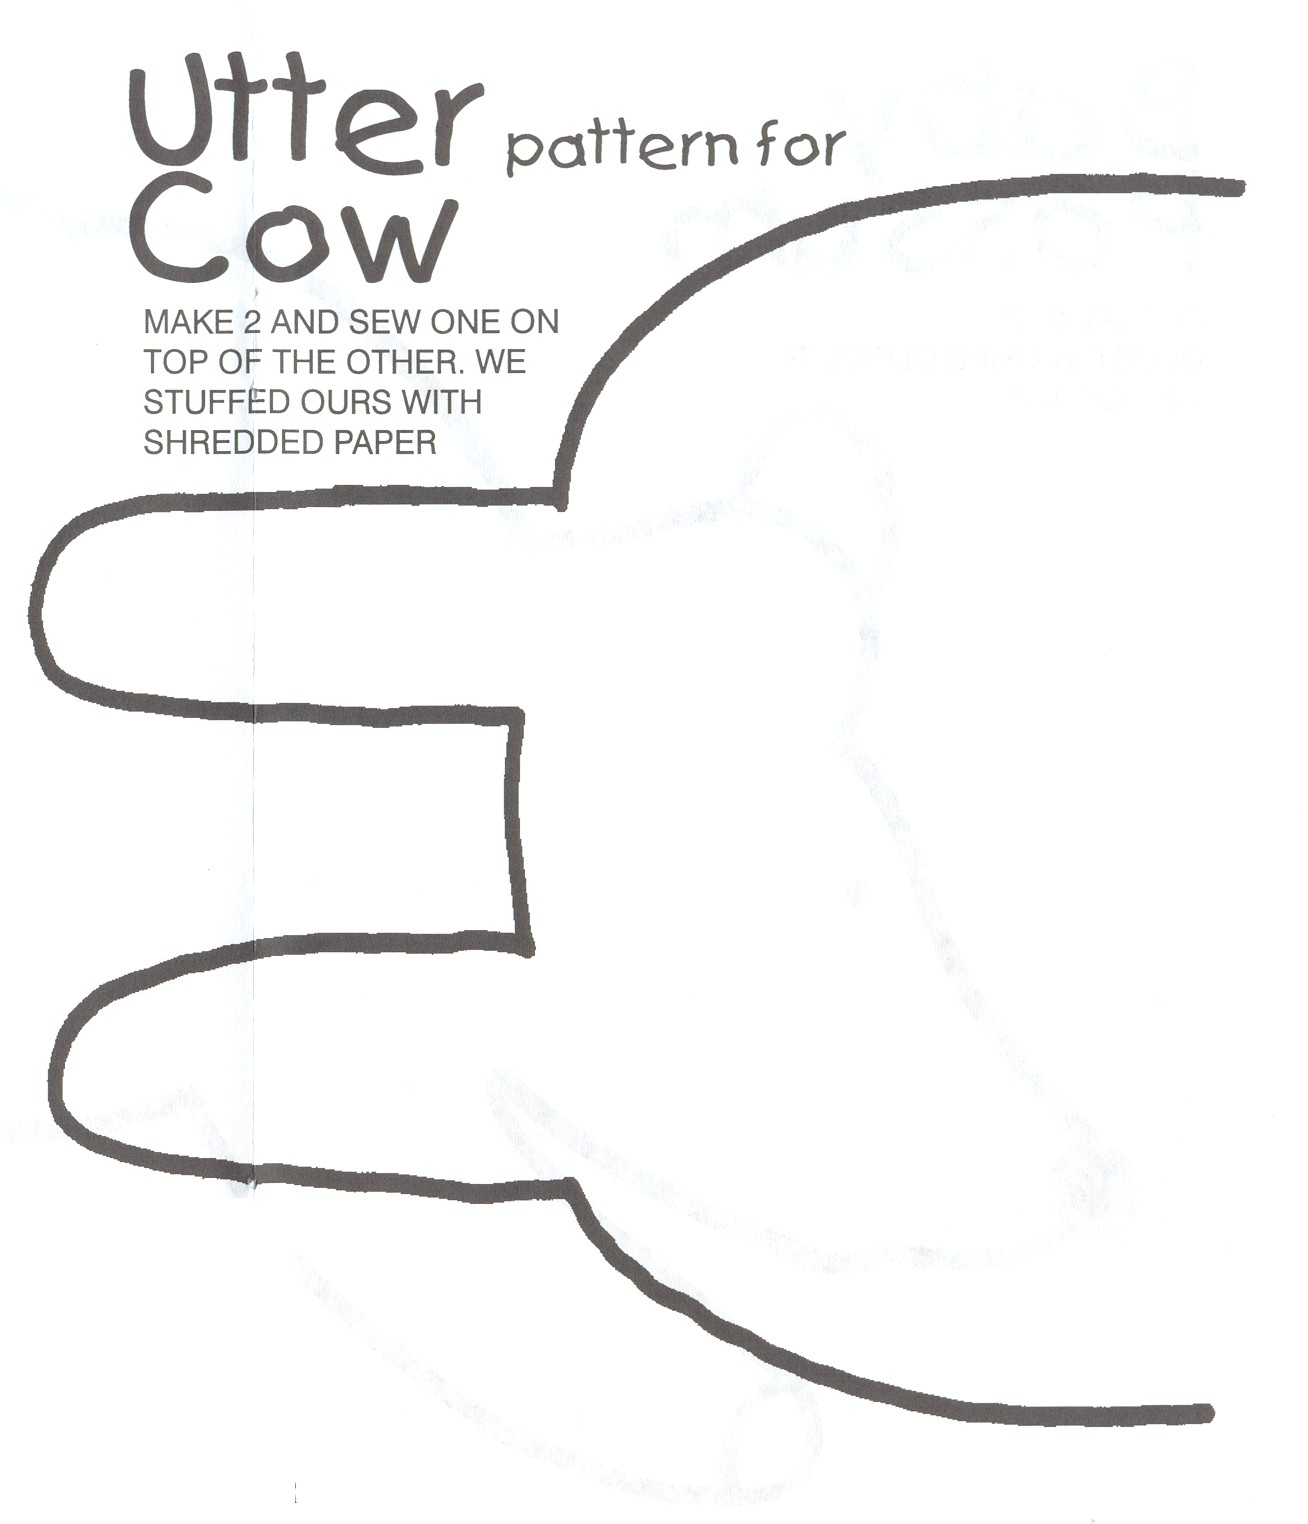

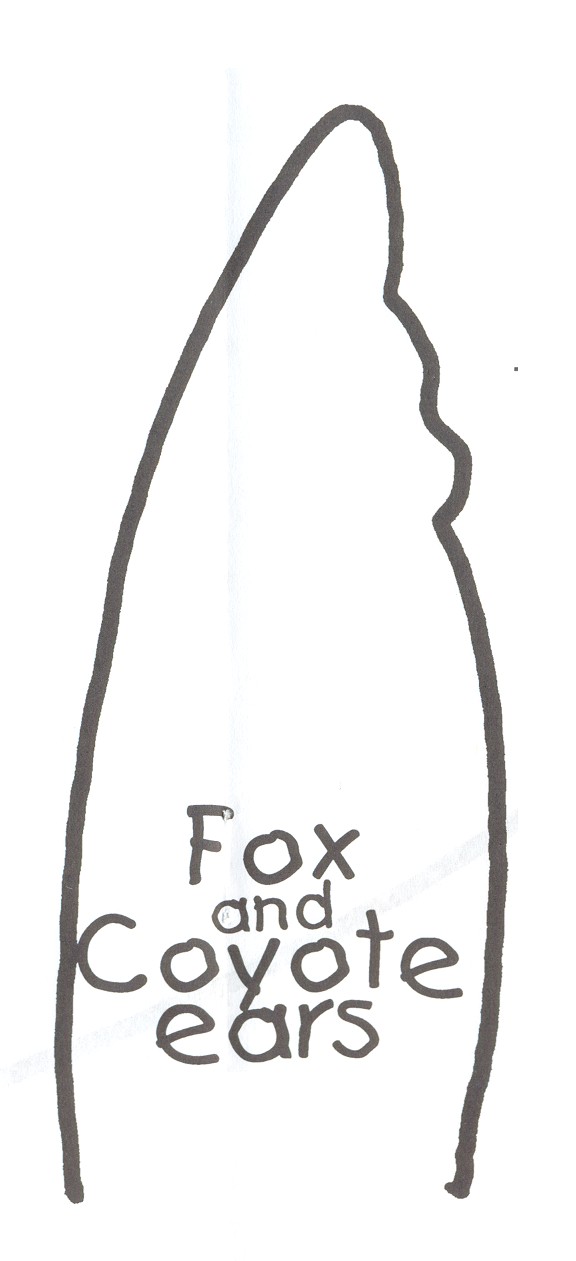
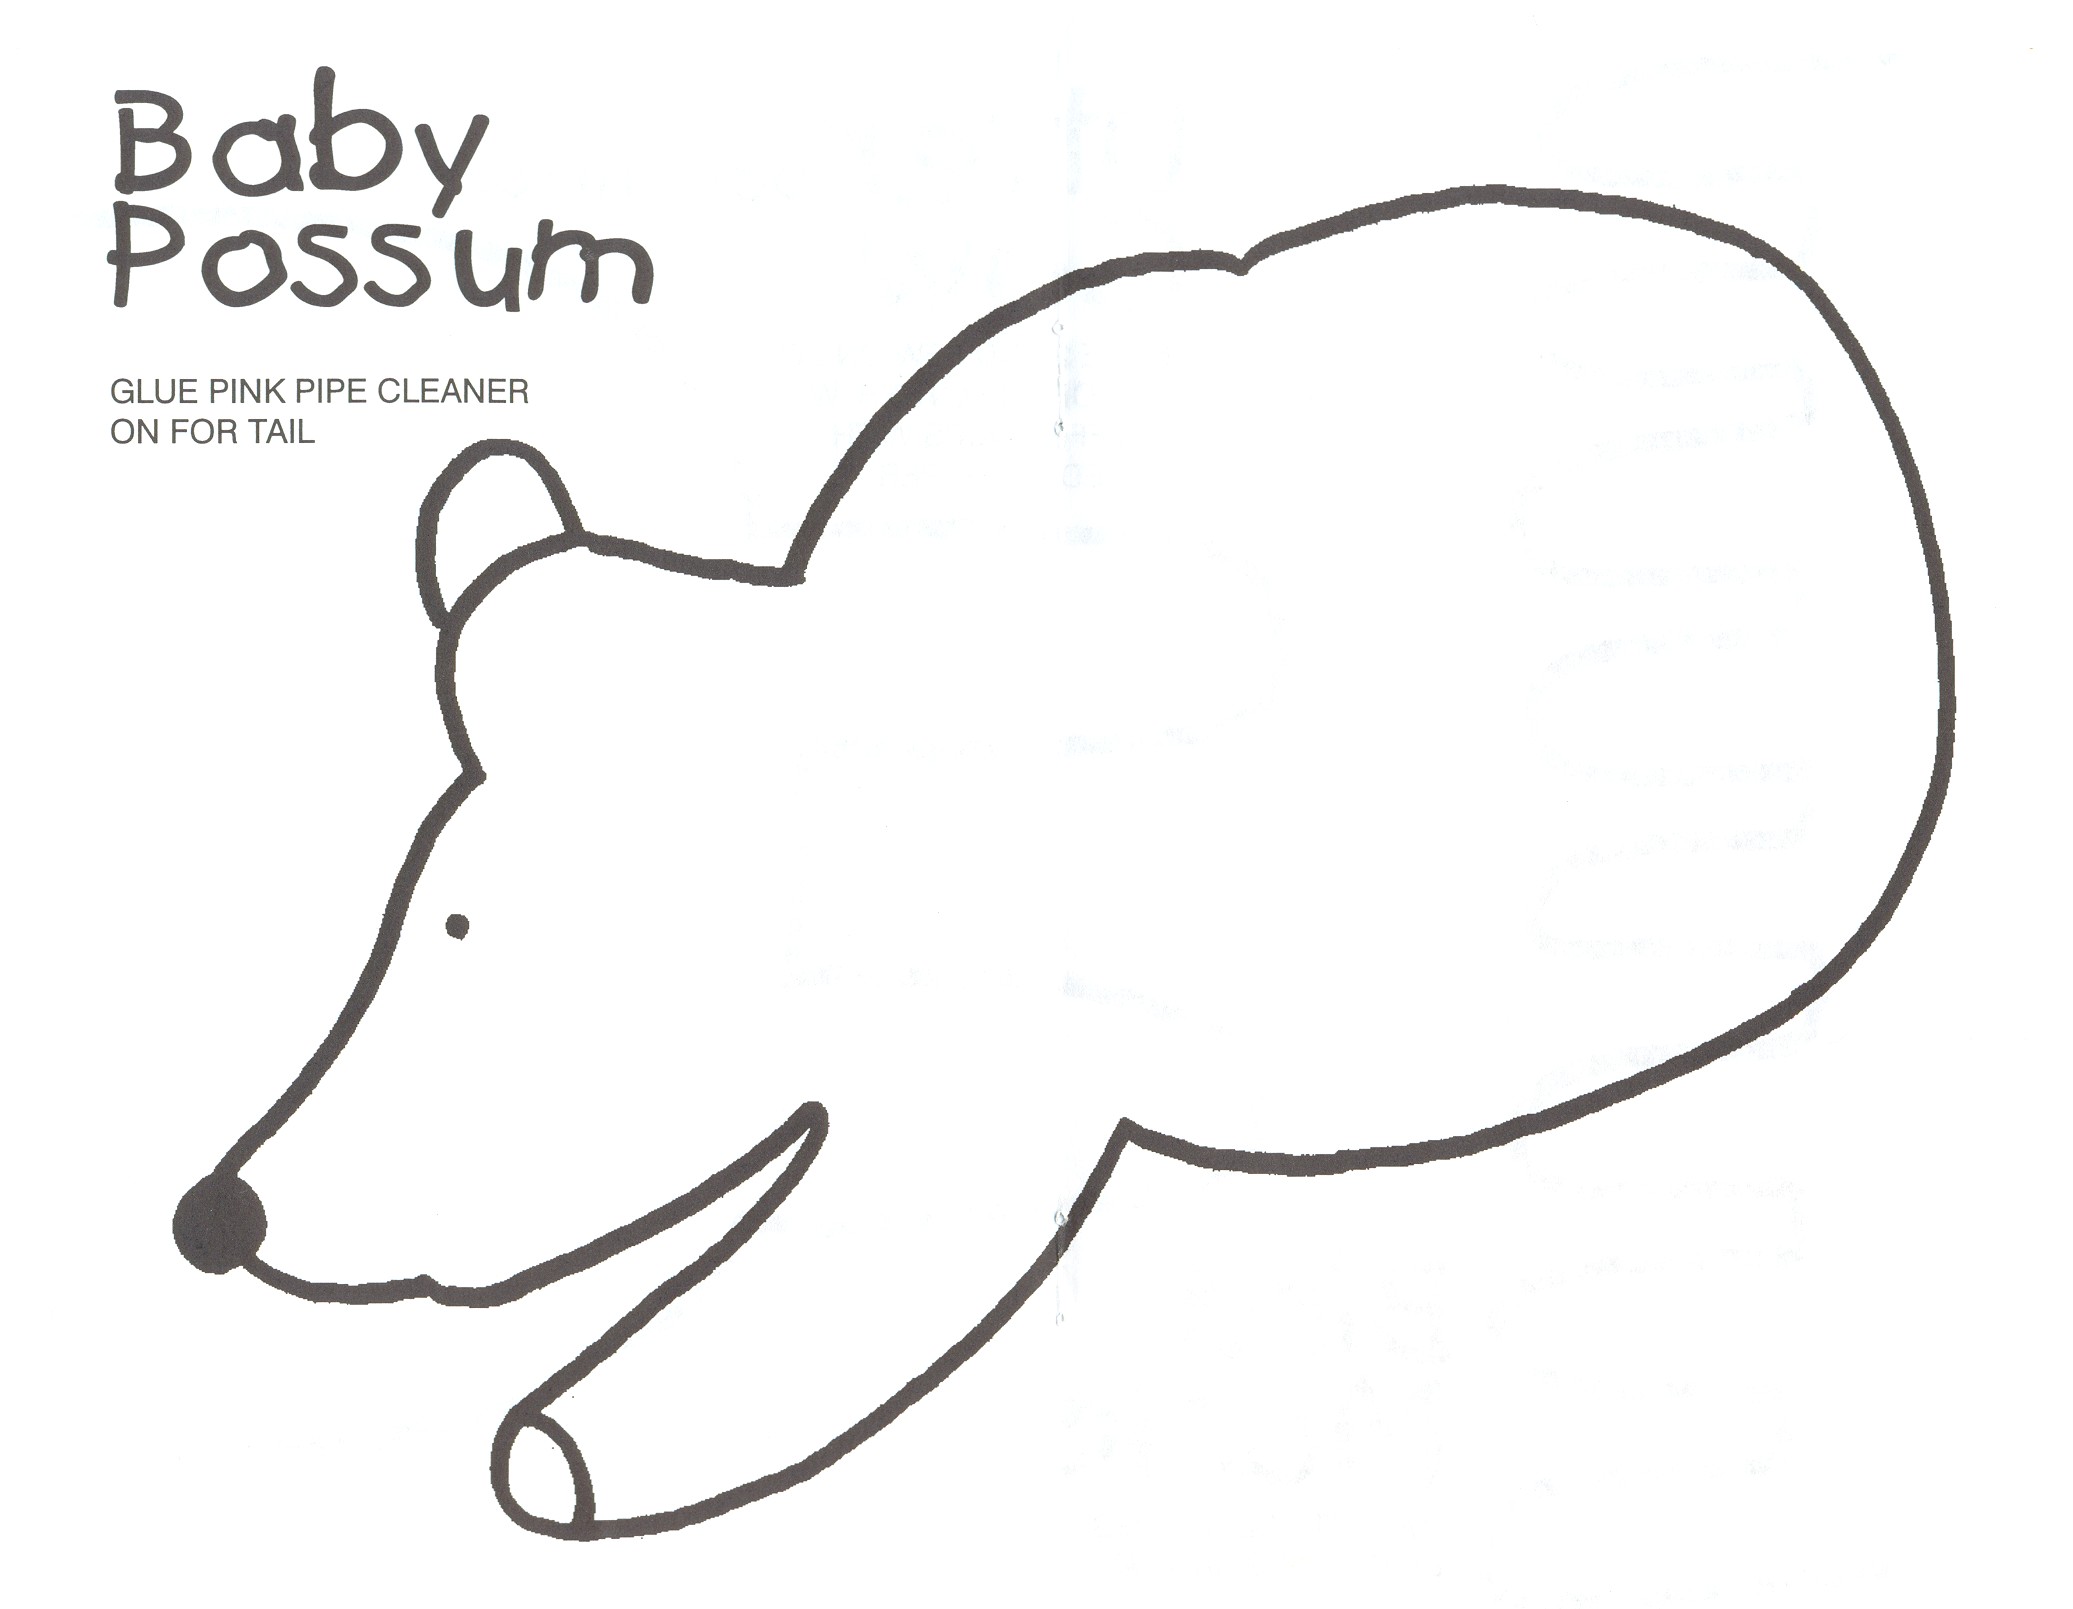
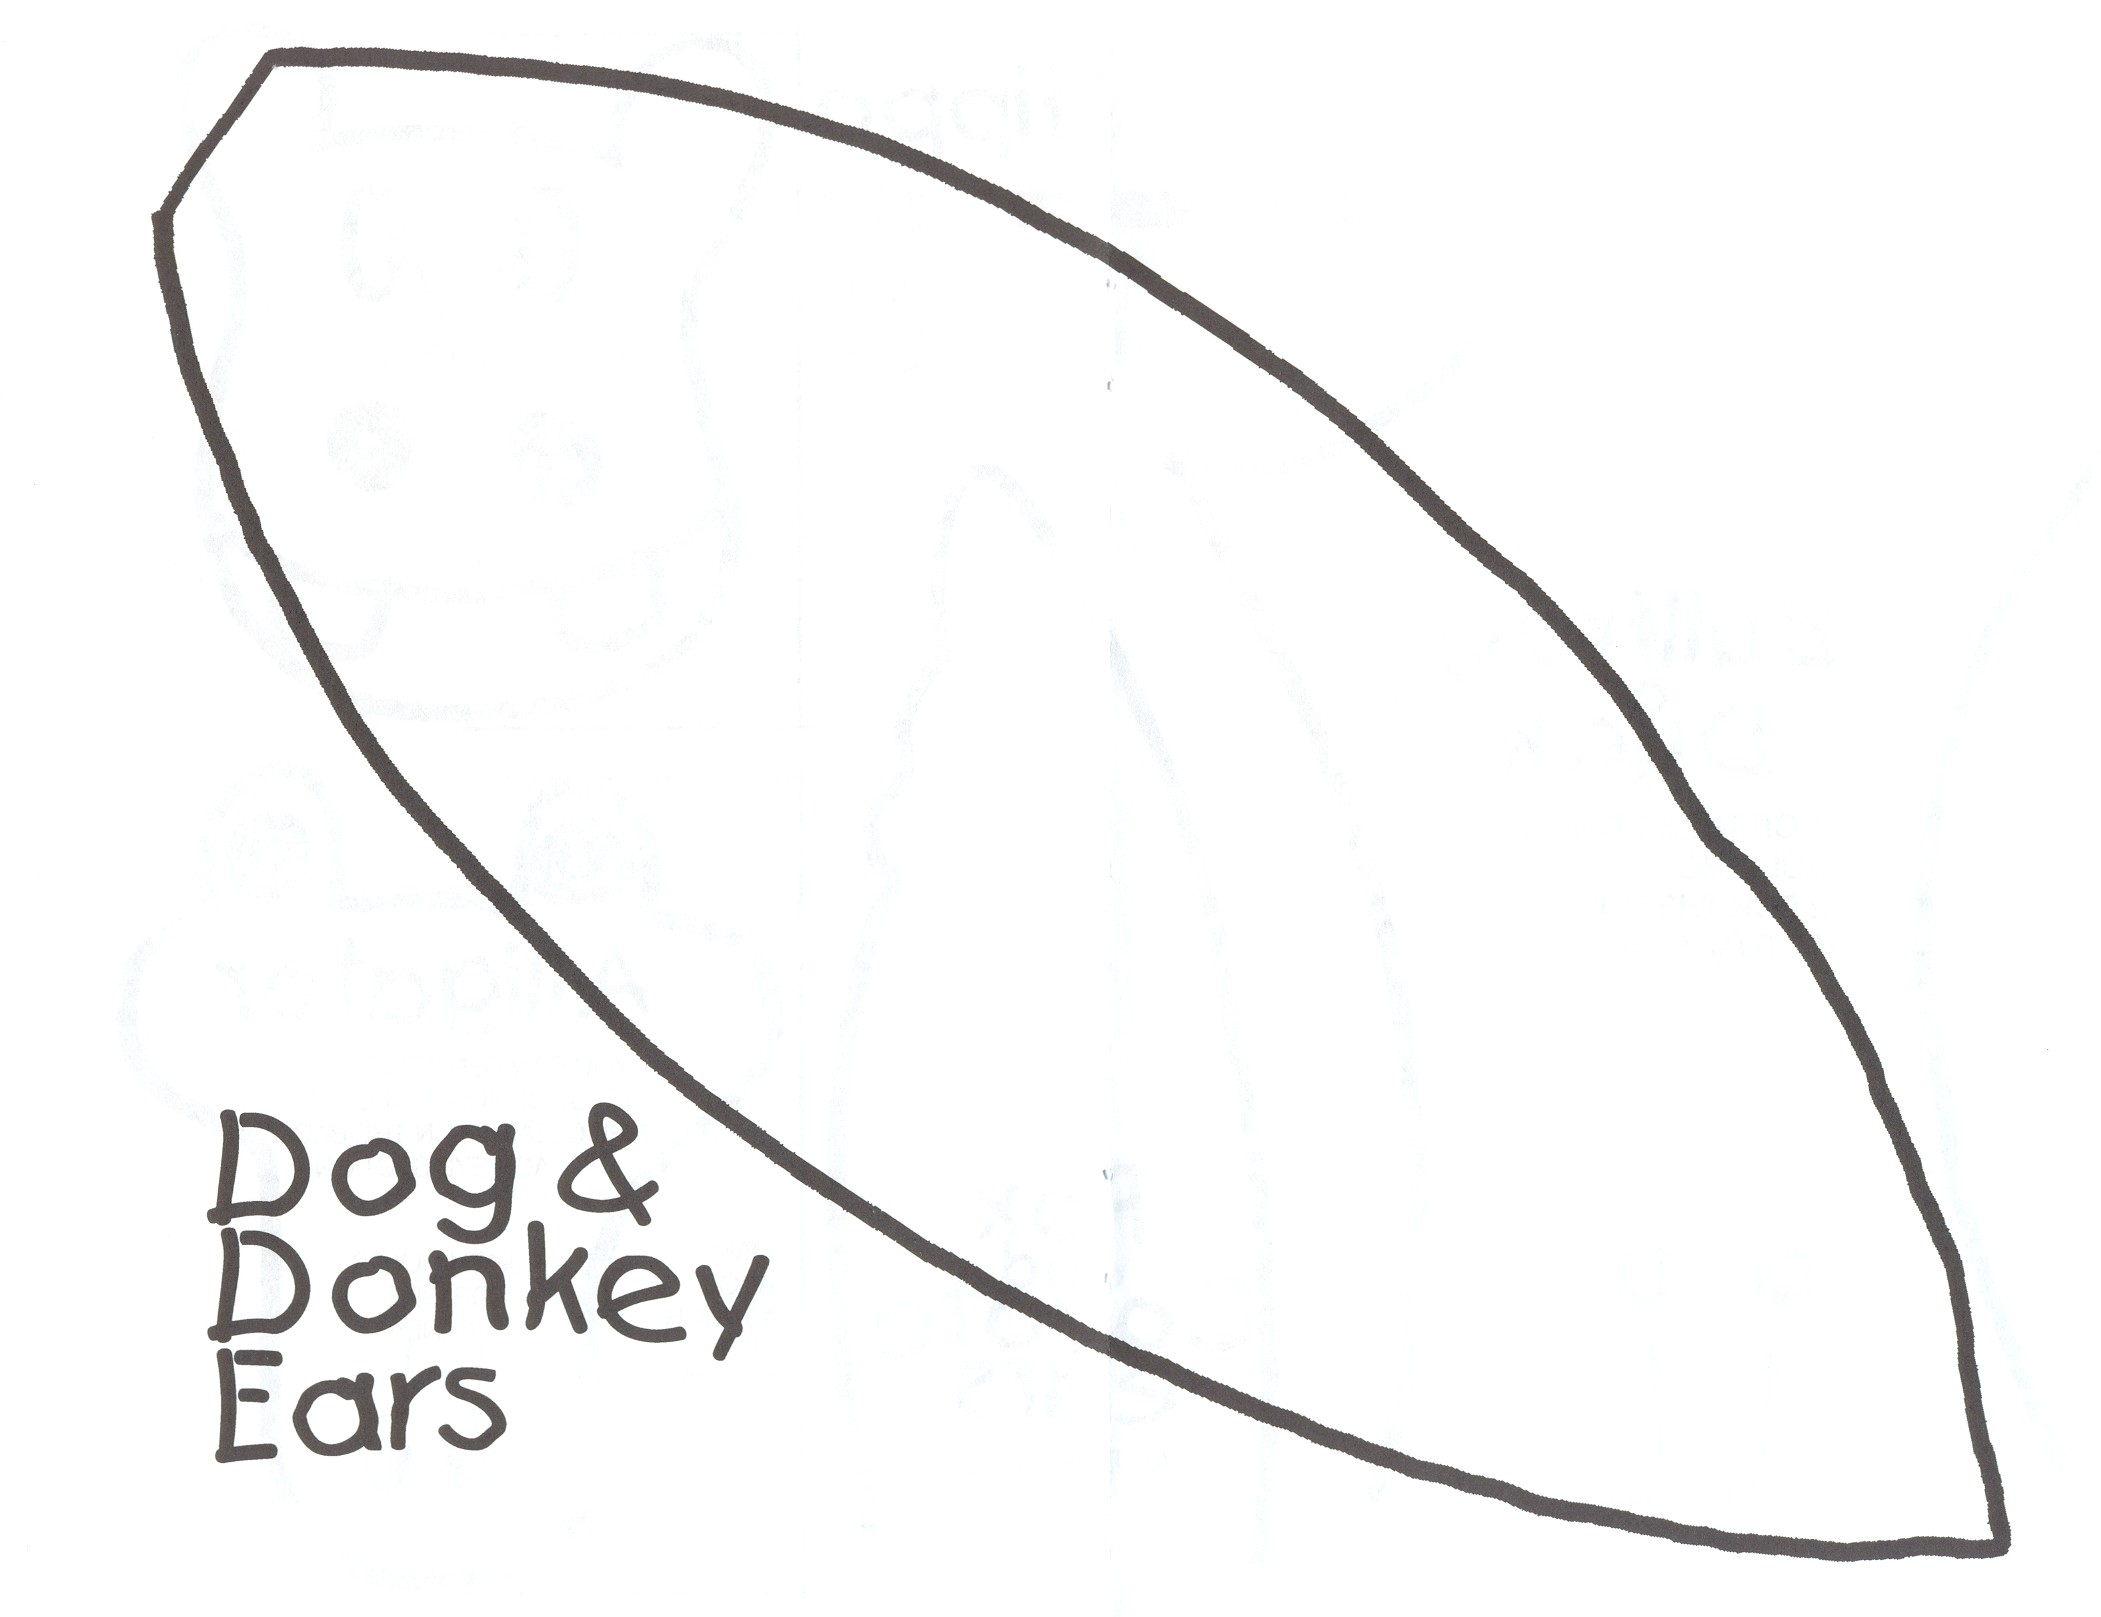
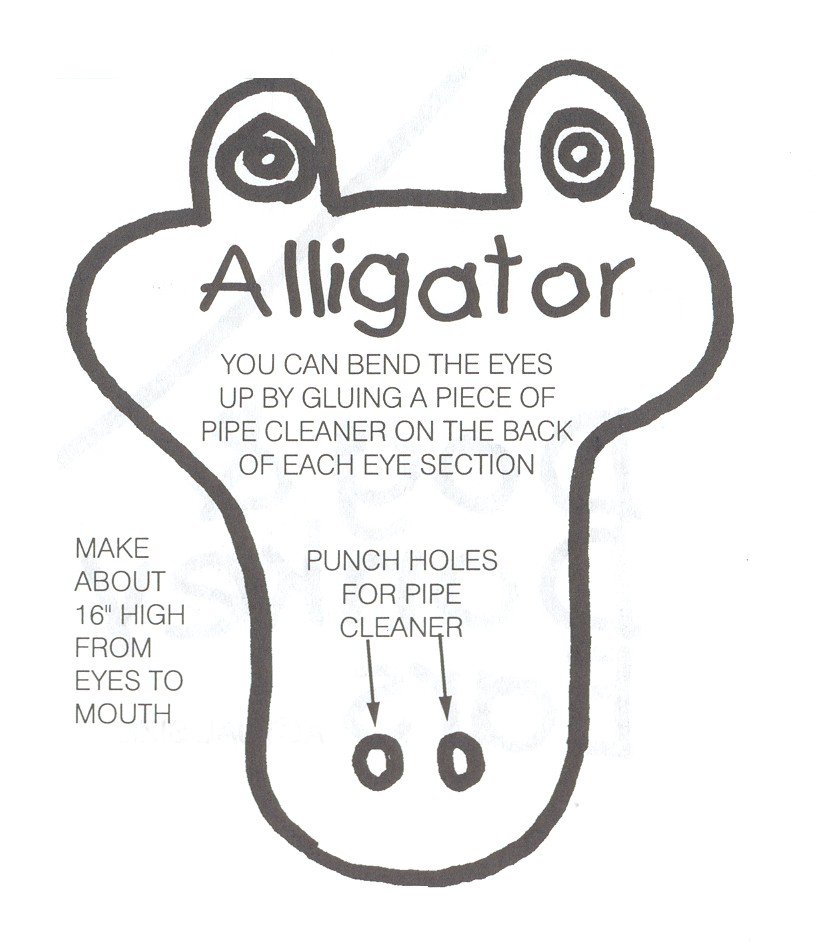
The song, Place in the Choir, was written by Bill Staines and Red Grammer was given permission to record it on his CD, Down the Do Re Mi
Place in the Choir, is a delightful tune to use in the classroom. It is often used with lessons related to music and sometimes the true meaning of the song gets lost. This song is about recognizing that even though we are all different, when all of our differences come together we can create something very magical. When we work together we blend together as one community.
The following is a short play to help young students understand the meaning behind the song.There are 22 animals mentioned in the song. We have included all the animals here in the play so that everyone in your classroom can participate.
NOTE: Click on Place In the Choir-Activities and Costumes to get directions for costumes for this play. You can use the simple head piece for the costume or make the complete outfit. Directions are included for both.
The play is set up as a narration so that Early Childhood Educators can read the narration and the students can act out what the teacher is reading aloud. For older students, teachers can break the narration down into speaking parts for students.
Title: Place in the Choir
© 2008 by Red Grammer and Maria Knickerbocker
Teachers have permission to use this play for classroom use only. For all other inquiries you must contact Maria Knickerbocker at maria@redgrammer.com
Setting: Somewhere on a farm
As the narrator reads, the children mime what the narrator is reciting.
Narrator:
It is late at night and all is quiet on the farm. Only Dog and Cat are prowling in the night.(Dog and Cat walk around the farm arm in arm checking on the sleeping animals).
Dog and Cat are best friends. That might seem strange for you to hear. Everyone always thinks of a dog not being nice a cat. But Dog and Cat have been best friends since they were little and they don't understand why people think they shouldn't be friends. They do everything together and this night they are singing together as they roam throughout the barn checking on the animals. (Dog gives a howl and cat gives a meow).
Perched up in the loft is Hoot Owl. Hoot Owl hears the music coming from Dog's howl and Cat's meow(the hoot owl cups his wings to his ears to listen to the music).Hoot Owl thinks they sound good together and he tells them so. "Dog and Cat you are making wonderful music together. You should become a duo and perform your songs here on the farm" Cat and Dog think it is a great idea and they begin to practice their singing (Cat and Dog point to their heads to show a great idea and then mime the singing).
The music from Cat and Dog wakes up Old Cow. He likes the music so he decides to join in the fun. Cat and Dog stop singing. They tell Old Cow that he can't be part of their duo because a duo is only for 2 and besides the cow is, well, old. Hoot Owl has been listening to Cat and Dog telling Old Cow that he can't be a part of the Duo. Hoot Owl gives a hoot and tells the story of how Old Cow once had to sing for Farmer Jones until all his other cows came home! "You see Old Cow has a big bass voice and Farmer Jones needed Old Cow to sing as loud as he could so that the lost cows could find their way home. He was a hero on our farm. And with a bass singer your duo could become a trio!" At first Dog and Cat were reluctant to listen to Hoot Owl but once they practiced with Old Cow they realized that they sounded even better as trio.
One night while practicing for an upcoming concert, Old Cow's friend Hippopotamus came for a visit. Hippopotamus loves to sing and he joined right in with the trio. Dog and Cat stopped singing.Dog told Hippopotamus that their group was a trio and a trio means 3only.Cat notices that Hoot Owl was listening again and even though he did give good advice about Old Cow,Cat didn't want anymore animals in the trio. He wanted Dog to be just Cat's best friend. So cat quickly added that only farm animals could be in the trio and everyone knows that a hippopotamus is not a farm animal.
Hoot Owl was in deed listening.Hoot Owl asked Hippopotamus if he traveled far in order to visit his friend, Old Cow."Yes",said Hippopotamus. "I wish I could be with my best friend everyday on the farm but I can only travel once in awhile for a visit. I miss him very much." Hoot Owl turned to Cat and Dog and asked if they have ever been apart. Cat explained that one time Dog had to go to the vet and stayed away for 3 days. Cat meowed day and night until Dog returned. This reminded Dog and Cat how it is hard not to be able to do things without having your best friend around. They huddled together and spoke in whispers to each other. They then turned to Hippopotamus and told him he could sing with them so he could be near Old Cow. Hoot Owl screeched, "Fabulous!" Now you have a quartet! And as the quartet practiced, they did indeed sound fabulous!
Off in the corner of the barn Cricket and Honeybee have been listening to all the wonderful music. Now everyone knows that crickets and honeybees are very musically inclined. In fact the Cricket lulls most animals to sleep with its fiddle- like music. And Honeybee's buzzing alarm sound wakes all the animals up in the morning. Slowly the insects crept toward the quartet and joined in the music. Dog and Cat stopped singing. "Not insects!"We are not going to have to have insects in our quartet are we Hoot Owl?"Hoot Owl peered out at Cat and Dog. "Well now Cat and Dog, you could leave them out. But could you take a look at Honeybee and Cricket for a moment? Really look at them? They look kind of sad don't you think?" (Cat and Dog nod in agreement). "Even insects have feelings. I don't think either one of you thought about your words before you spoke. It is important to think about what you are going to say. Words can hurt or words can make you happy. Your words could make Honeybee and Cricket sad enough to leave our farm. Then who will wake us up in the morning or sing us to sleep at night?" Cat and Dog huddled together once again and then turned to Hoot Owl and asked, "But what will our group be called now?" Hoot Owl thought out loud, "Well, you have the bass, the part on the bottom,where Hippopotamus moans and groans with a big to do and Old Cow goes, Mooo. You, Dog and Cat, you take up the middle where the honeybee hums and the cricket fiddles. But you should ask the donkey to bray and the pony to neigh and bring the coyote in to howl".Oh Yea! We could also use Bullfrog's croak to complete the bottom."(Dog and Cat go off stage to bring in Bullfrog who croaks, Donkey who shouts out a bray, Pony who sings a loud neigh and Coyote gives along howl)
"Terrific!" says Hoot Owl. "But", Dog says to Hoot Owl, "That's even more animals. What will we call ourselves now?" "Nothing yet", says Hoot Owl. You're missing my friend, Jaybird". Hoot Owl flies away to get Jaybird and returns. Hoot Owl says, "With Jaybird and me you have the top where the melody and the high notes ring. Cat and Dog you can now be called a choir. Let's practice shall we?"
So the choir with all the different animals and insects practiced for an upcoming concert. On the day of the event,the farm began to fill up with the audience. Duck quaked his way to his seat but the 'Possum didn't have much to say. He quietly waddled to his seat. Porcupine entered while talking to himself, again. He was joined by Fox, Ox and Grizzly Bear. Grumpy Alligator came with Sly Raccoon. Hawk was high in the rafters with Turtle Dove. This audience wasn't sure what to expect. How could all these different kinds of animals and insects work together to create music that would sound good? This audience didn't think it was going to work.
The choir came out on stage and they began to sing:
All God's Critters got a place in the choir. Some sing low and some sing higher and some sing out loud on a telephone wire and some just clap their hands or paws or anything they've got! (here the choir makes the motions for the song).
All the animals sounded so wonderful together that the enthusiastic audience couldn't help but join in with the singing of the choir.
Cat and Dog turn to Hoot Owl and asked, "Hoot Owl, what do we call ourselves when all the animals in the choir are singing AND all the animals in the audience are singing together?" Hoot Owl did not hesitate with his answer, "Why, Cat and Dog, we have a community!"
The End
1. Using a world map, have students plot all the places that are listed in the song. Have students locate latitude and longitude for all the places listed in the song (intermediate grade level).
2. Assign to groups or individual students a place listed in the song. Have them do some research so that they can create one question about the place they are researching. Collect all the questions that the groups or individual students created. Enter those questions into a crossword puzzle website to create a crossword puzzle for the kids to complete. Kids enjoy entering their own questions but if you don't have time, there are 2 crossworld puzzles attached to this guide. One for primary and one for intermediate. This guide used the following website to create crossword puzzles but there are others that you may be more familiar with (grades 2 and up): http://www.supercrosswordcreator.com
3. Create a post card about your state or town. On the post card point out all the great sites Red should visit in your state or town. Send the post card to Red (or give it to him when he arrives at your school). Red would really like to know what he should see and do when visiting your area. If you choose to mail the post card to Red, use the following address: Red Note Records, 5049 Orangeport Rd., Brewerton, NY 13029 (grades 3 and 4).
4. Here is an idea that could be used in a presentation to parents or for a school assembly: Teacher(s) give students a card with the name of a place form the song. The student researches to find which continent it is located on. Either on the playground or on a stage, use tape to outline the continents. Each child sits within the outline of the continent that is the place on selected card. The class sings the song. As each student's "place" is named, he raises the name card overhead and then lowers it. Video tape it for your school web site. (intermediate grade levels)
5. Using the list of Geography terms, have each student take a name of a place from the song and see how many geography terms they can find for their named place. Geography terms include: basin, bay, canal, canyon, coast, dam, delta, desert, fault, glaciers, gulf, harbor, hill, island, lake, mesa, mountain, mountain pass, mouth, ocean, peninsula, plain, plateau, port, reservoir, river, source, valley, volcano. (intermediate grade levels)
6. Pick one of the places Red sings about and create a travel brochure or poster, Display around the school. (intermediate grade levels)
7. Red sings about mountain, deserts, plains and jungles in this song. Make a diagram of these and more. The image included in this guide comes from the Pinterest Web Site. (grades 2 and up).


"Power" Photo and Writing Exercise
Materials:
- Camera
- A very large Bucket Filler Bucket decorated. You can get a large plastic bucket form Lowe's and paint it a bright color and add ribbon for the handle. Or, you can wrap the plastic bucket in colored duct tape. Paint a face on the bucket.
- Paper for writing.
Preparation:
- Play the song, "Power to Change the World" and have students listen to the words. Tell the students that they are going to have their picture taken in such a way that it will show the power that they have as a Bucket Filler.
- Take a picture of each student in the class holding the Bucket Filler Bucket over their head and pose like they have the muscle power to be able to hold the bucket up.
- Have each student glue the picture to the top of their wrtiting paper (see below for writing assignment).
Activity:
- Play the song, "Power to Change the World" and then have a discussion about what it means when Red sings the line, "We have the power to change the world". Discuss the words from the chorus and the verses to the song.
- Ask students to think about how they might be able to change the world right now.
- Give the students the writing assignment: How I have the power to change to the world.
- Place their writing assignment below their picture and hang them around the room as reminders about how powerful they really are with their Bucket Filler Buckets.
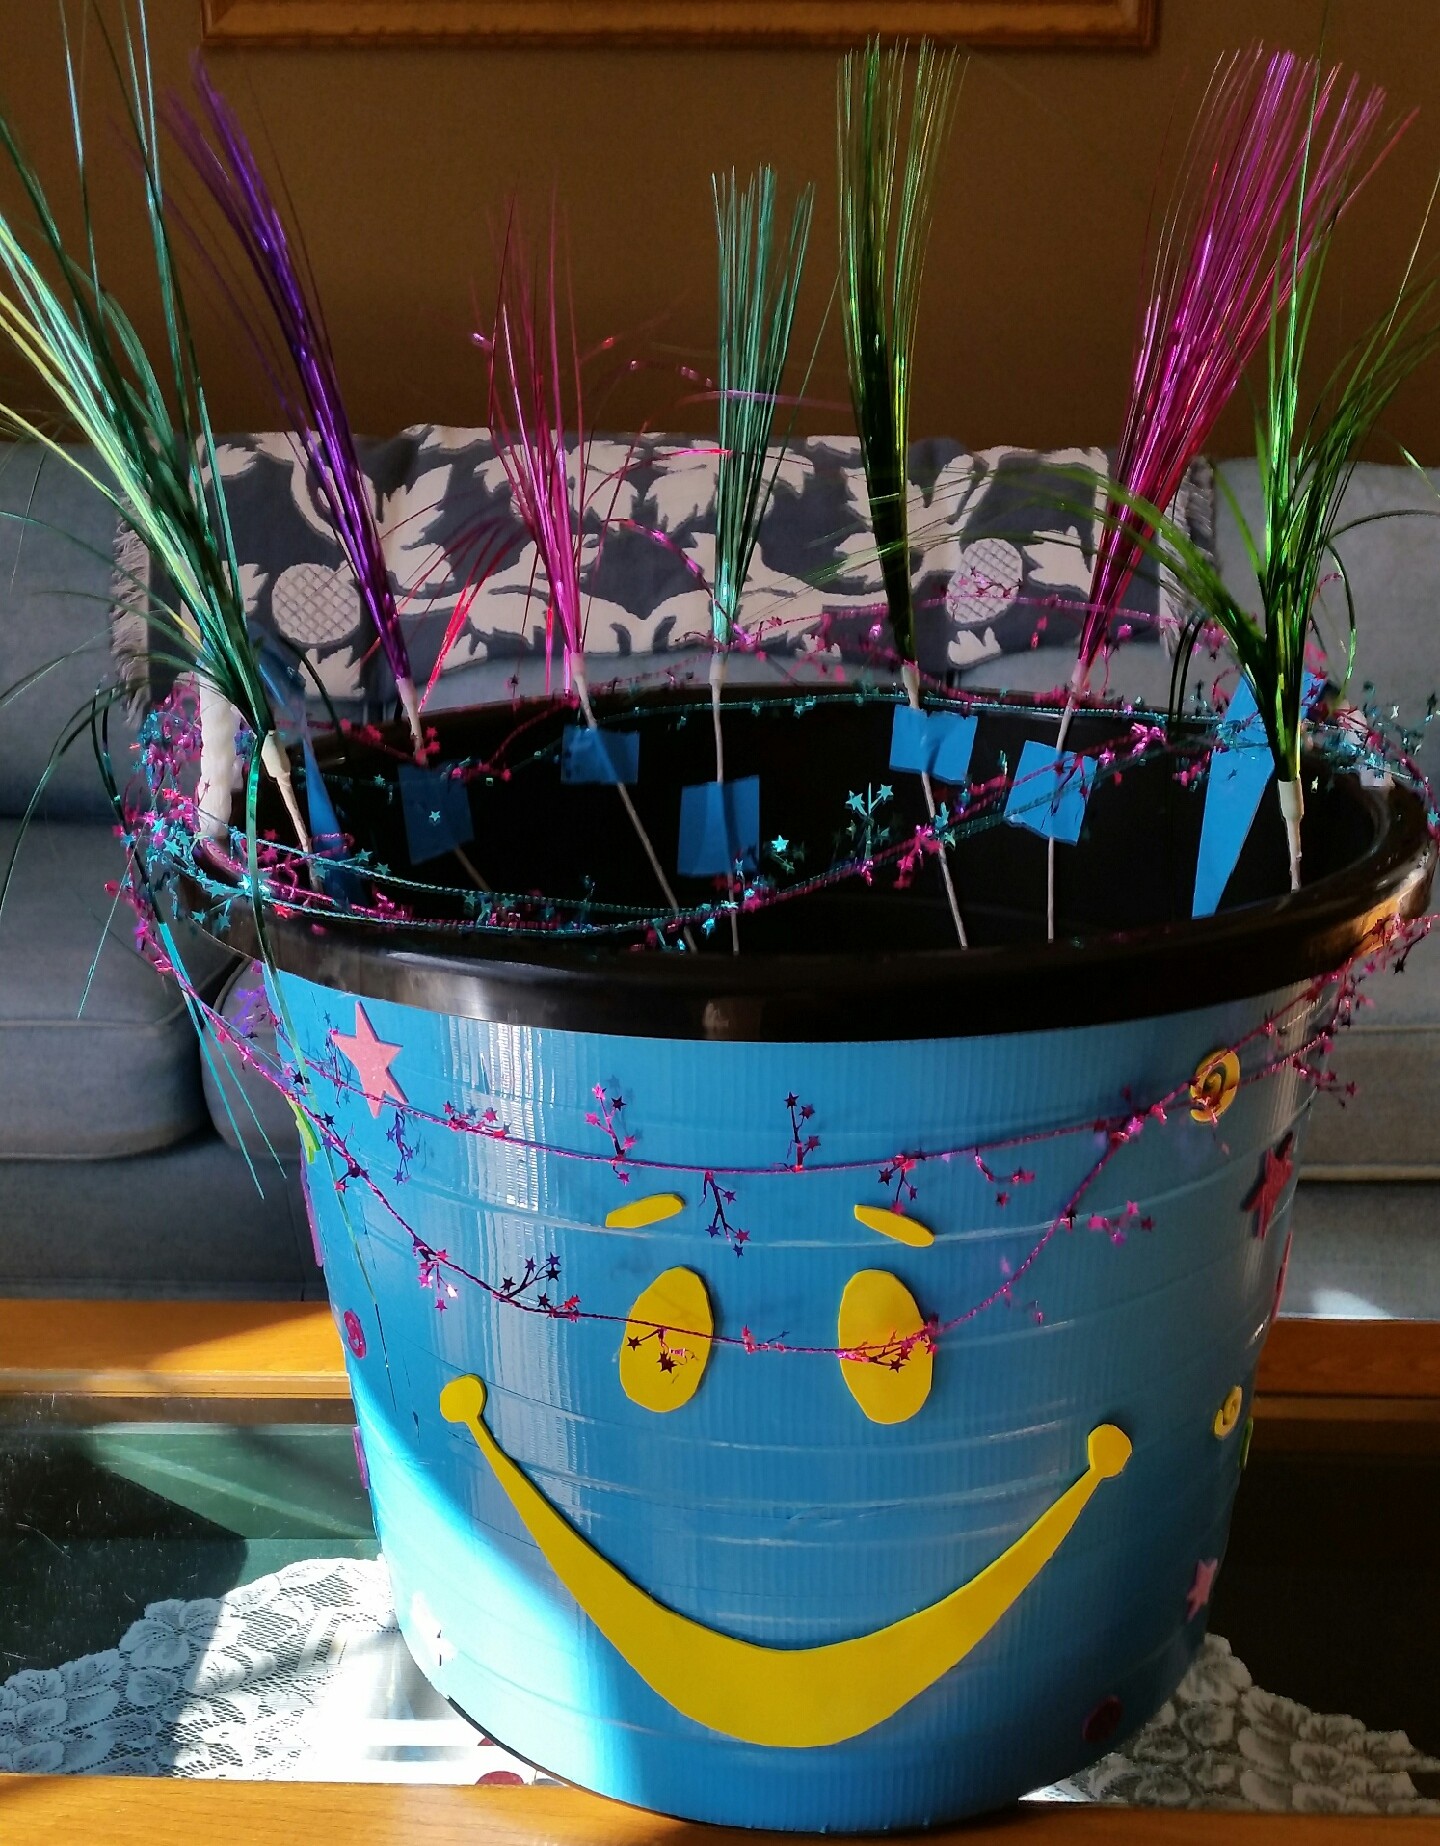
Movement Lesson
You will need the song, Respect, from Red Grammer's Grammy nominated recording, Bebop Your Best!
Note: To sign the letter "R" cross your fingers (index and middle). To sign the word "respect", bring the "R" hand toward the face and down, ending with the "R" fingers pointing up.
This activity is done with a partner. To begin you should be facing your partner.
|
Chorus: If I respect you |
Make the sign for "respect" with both hands and point to your partner. |
|
and you respect me |
Make the sign for "respect" with both hands and point to yourself. |
|
And we respect each other |
Shake right hands with partner and don't let go. Add shaking left hands with your partner (it will end that you are criss-crossing shaking hands). |
|
What a world this would be |
Let go of hands and as you do, raise your hands up over your own head to form a circle by the time Red sings the word "world". Then spread your hands outstretched by the time Red sings the word "be" |
|
You'll be glad I'm me |
"R" fingers with both hands point to yourself. |
|
and I'll be glad I'm you |
"R" fingers with both hands point to your partner. |
|
'cause that's just what folks who respect each other do |
With an eight count turn yourself around. While turning, alternate lifting each hand in the air to the beat of the music. It doesn't matter which way you turn but when the 8 count is finished you will still be facing your partner. |
|
First verse: If you let me talk 'til I'm finished |
With your hands behind your back you side step 3x to your right away from your partner. |
|
And I listen when you speak your mind |
You stay still and your partner side steps 3x to his/her left until your partner is in front of you again. |
|
And we choose our word carefully. We'll hear each other differently
|
You and your partner side step 4x together in the opposite direction you just traveled in. You will still be facing your partner as you side step and when you stop. |
|
It's one more way respect can be defined |
With an eight count turn yourself around. While turning, alternate lifting each hand in the air to the beat of the music. It doesn't matter which way you turn but when the 8 count is finished you will stell be facing your partner. |
|
Chorus: |
Repeat chorus motions |
|
Second verse: |
Repeat verse motions. |
|
Chorus: |
Repeat chorus motions until last line of chorus. |
|
Coda: That's what folks, That's what folks |
Partners grab left/right hand;partners grab the other hand |
|
That's what folks who respect each other do. |
While holding hands twist once around (that is called the "coffee grinder" in dance) and then let go of hands and bow to your partner. |
Definition
The ability to meet obligations; that for which one is answerable; a duty or a trust.
Literacy
Pigstyby Mark Teague
Materials Needed
1. Materials needed for activity (see below under The Weight of Irresponsibility)
2. The song “Responsibility” from Red Grammer's recording Bebop Your Best
Read the story Pigsty to the class
Have a discussion about:
1. What does it means to be responsible?
2. Are you responsible for picking up your own room?
3. What other responsibilities do you have at home?
Activity: The Weight of Irresponsibility
When we are responsible we deal with the tasks before us and move on. What happens if we don't handle our responsibilities?: Make a list of some responsibilities. You can use those in the song and add others.
1. feeding your pets
2. putting away the books you've read
3. hanging up your clothes
4. making your bed
5. finishing your homework
6. doing the dishes
7. taking the trash out
Have a volunteer come to the front of the class to represent someone who is not doing his responsibilities. As you list the responsibilities he/she fails to do, add the responsibility onto the student. Start with hanging up your clothes. The student then puts the pile of clothes on. Then make the bed. Add a sheet draped over the student's shoulder. Not finishing your homework would be to stuff papers in neckline and up the sleeves. Not feeding your pet:.take a stuffed animal and put it around the student's neck. You can Velcro the animal's feet together. Put some books around a strap to represent the books that are not put away. You can attach those to the belt loop. Dirty dishes is easy! Glue some fake food to some plastic plates and put a little Velcro on the back of the plates. Attach them to the shirt. Finally, stuff a trash bag with shredded paper and tie it to a belt loop. Now the student is loaded down with neglected responsibility. It is impossible to do an activity with so much “weight”! Ask the student to now use a hoola hoop!
For pre-school and Kindergarten have a student jog in place while holding a laundry basket (the kind with holes so the class can see what is going inside the basket). Instead of pinning the items on the student as in the description above you can ask the student what jobs he/she and if he/she doesn't always do them and on time place an item in the laundry basket that represents that job. When the basket is full it will be more difficult to jog with the basket full. The student may even have to set the basket down because it has become too heavy to hold. Ideas for responsibilities:
1. Do you always pick up your toys? (have a big heavy toy that will go in the basket)
2. Do you always hang up your coat? (have a coat to go in the basket)
3. Do you pick up papers and pencils off the floor? ( have a pack of paper and pencils to go in the basket)
4. Do you empty your backpack? (have a full backpack to go in the basket)
5. Do you brush your teeth? (have a toothbrush and toothpaste to go in the basket)
5. Do you take out the trash? (have a trash bag full of shredded paper to go in the basket)
6. Do you set the table as soon as you are told to? (have dishes and cups and silverware to go in the basket)
7. Do you make your bed before you leave for school? (have sheets to add to the basket)
Note: We tried to think of responsibilities that younger students are required to do while at home or in school.
A Movement Lesson created by Red Note Records
Materials Needed
“Say Hi!” from the recording Teaching Peace
CD player
Steps
1. Children form two circles, an inner circle and an outer circle. For the first verse, both circles will move clockwise to the beat of the music. As they are moving, the children imitate what Red is singing in the first verse. For example, Red sings “Did you know some kids are shy?” – the children will act out being shy by lowering their head with eyes away from their friends, etc.
2. At the chorus, the circles stop moving. The children on the inside circle face the children on the outside circle. The children stand up tall, take an exaggerated deep breath, look their partner in the eye (or point to their own eyes), wave, and say “Hi!”
3. During the second verse, the children follow the same procedure as in step 1.
4. For the chorus, the children follow the same as step 2.
5. During the instrumental interlude (when Red is whistling), the children are still facing each other. Now the inside circle goes clockwise and the outside circle goes counter-clockwise. They stop and face each person before moving on, say “Hello,” and give their names. This continues so that every one will get a chance to say hello to each other and, hopefully, it is completed before the whistling is done.
6. During the third verse, the children follow the same procedure as in step 1.
7. At the very end, when Red says “Don't be lookin' down at your feet, you've got to look 'em in the eye and say…” both circles stop and face each other again and they shout out “Hi!” to each other.
This is a great song to use at the beginning of the school year so that students can introduce themselves to each other. It can be used as a fun way to introduce a new student to the rest of the class during the school year. It is also a fun song to use when a guest comes for a visit to your classroom.
These very simple moves have a very dramatic effect on the audience in a performance. They can easily be taught to children if you first teach them about finding their windows.
Materials
None
Stage Set
Use risers but if risers are not available then the back row of students stands, the middle row kneels up and the front row sits with their legs crossed. There should be 12 people, 4 in each row. Ask the students to find their windows (that means looking in between the 2 students heads in front of them. Now they are in sets of 3 (see diagram). Have all students face diagonally towards stage right with their heads down.
Verse One
On “See Me Beautiful” Group 1 looks up but off to stage right and holds that position. On “Look for the best of me” Group 2 lifts their heads and looks in the same direction as Group 1. Group 3 lifts their heads in the same direction on “It's what I really am”. Group 4 looks up on “And all I want to be”. Everyone stays in that position as they continue singing, “It may take some time, it may be hard to find but see me beautiful”.
Verse Two
On “See Me Beautiful” all four groups turn their heads only toward center stage. Their bodies remain diagonal facing stage left. Their eyes look out above the audience. They all remain in this position for the entire verse.
Note: During the La La's (interlude) a ballet dancer could perform.
Repeat Verse One
This time on “See Me Beautiful” Group 1 will turn their bodies to center stage and they will look directly at the audience. Group 2 makes the same move on “Look for the best of me”. Group 3 will make the same move on “It's what I am really am” and Group 4 “and all I want to be”. They remain in this position until the end of the song with their eyes focused on the audience.
Diagram
| X | X | X | X | ||||||
| X | X | X | X | ||||||
| X | X | X | X | ||||||
| Group 1 |
Group 2 |
Group 3 |
Group 4 |
The screen that we are using in our workshop comes from Lakeshore (See Page 54 of Lakeshore's 1999 catalog). This Shadow Play Screen is a terrific interactive tool for enhancing young children's gross motor skill development. It is perfect for encouraging dramatic play. It is light weight and can easily be taken apart and stored away.
In this workshop we have turned the screen to a vertical position so that it can be used with adults. For classroom use, the screen is set up in a horizontal position so that 2 or 3 children can stand behind it at one time.
Light Sources
We are using a slide projector (you can do this with or without slides). Lakeshore also recommends an overhead projector. You can experiment with light from an open window, a flashlight, or a film projector. Make your shadow projections more interesting by placing a colored transparency or colored sheet on the overhead, or by using a colored light bulb in your light source.
Music and the Shadow Play Screen make a wonderful combination for classroom use. Music and dance can get children warmed up and comfortable with performing in front of others. The “barrier” of the screen will help even the most self-conscious children feel comfortable moving in front of an audience. Before beginning an organized activity we suggest just setting up the screen with a few simple rules and let the children “explore”. You will be surprised at the creative ideas that they can come up with to use the screen.
You can facilitate movement by having children take turns being a mirror. Have one student stand behind the screen and made broad movements. The children on the other side of the screen can watch and imitate. Using their hands and arms they can cast shadow puppets, or have shadow plays by having children make stick puppets. For a more interactive variation children will enjoy starring in their own shadow plays. Ask a few children at a time to enact a play from behind the screen while others act as the audience until it it their turn.
Below are three activities to get you started.
Activity #1
You will need:
* The song “Barnyard Boogie” from the recording Teaching Peace.
Form a circle with the class. Place the shadow play screen at one end of the circle. The children move the circle in one direction so that eventually each child will walk behind the screen. Play the song “Barnyard Boogie”. As each child takes their turn to walk behind the screen they make broad movements: jumping, dancing, waving arms, kicking etc. The other children in the circle can imitate these gestures. As they become more comfortable with it you can have them act like a rooster while standing behind the screen.
Activity #2
You will need:
* The song “Say Hi!” from the recording Teaching Peace.
* Paper puppets on a stick of a dog, a cat, and a smile face.
Two children stand behind the screen and act out the song about being shy - “Say Hi!”
Activity #3
You will need:
The song “Big Rock Candy Mountain” from the recording
Red Grammer's Favorite Sing Along Songs
Material in the shape of a mountain to tape to the back of the shadow play screen
Gum and Rock Candy glued to 2 suspenders
One puppet of a bee and one puppet of a bird
Hand actions created by the class to use for the song.
An example would be “buzzing of the bees” - thumb and index finger come together and then wave hand in circles in the air.
Two children stand in front of either side of the screen wearing the suspenders. Using the class hand motions act out the song Big Rocky Candy Mountain. Both of the two children will have one of the puppets to wave behind the screen when those animals are sung about in the song. You could have them pull the gum off the suspenders to chew and make bubbles with during the song.
Shadow Puppets
Materials
File Folders or Oaktag
Tissue Paper
Laminate or Clear Contact Paper
Velcro Dots
Doweling (7/16 x 36)
Scissors (Manicure Scissors)
To make the puppets
Trace onto oaktag the object to be the puppet.
Trace this pattern onto tissue paper.
Using manicure scissors, cut out the inside of the oaktag object leaving a 1/4 border.
Glue the tissue paper onto the oaktag border, you can add details by using fine tip markers and drawing on the tissue paper.
When you are finished adding details to the object, laminate it or cover it with contact paper. We use contact paper.
Attach a small Velcro dot to the back of the object. Note the back is the side with the oaktag border.
Attach the other part of the velcro to the end of the doweling.
Materials
1. Maraca or any other kind of shaker
2. Materials such as markers, ribbons or rope for hair, glue
3. The song “Shake Your Brains” from the recording “Teaching Peace”
Activity
1. You can have each student turn a maraca into a person or you can make just one for classroom use
2. Sit in a circle and play the song “Shake Your Brains” and have the student shake the “person” and then pass it on. Stop the music and whoever has the maraca must answer a question. For example: If you have cleaned up your toys after playtime is over but some others in the classroom have not yet what could you do? Continue the song again and pass the “shaker” around until it is time to stop the music again and ask a new question.


